A lot of the PHP that I currently write uses one of two standards: PSR12 or WordPress (though there are some times where I’ll pull up another project with a different standard).
For years, my standard approach to changing code standards in the IDE has been to do the following:
Install the standard that’s required (if I don’t already have it),
Modify settings.json in Visual Studio Code so that it uses the same standard used in the rest of the project.
It’s a little cumbersome but it worked well enough. Overtime, I end up with a lot of settings commented out that I enable based on the project.
But this was getting tedious.
Instead, I preferred to quickly select and change coding standards within the IDE via the command palette or, really, a shortcut. So I wrote a Visual Studio Code Extension to do exactly that.
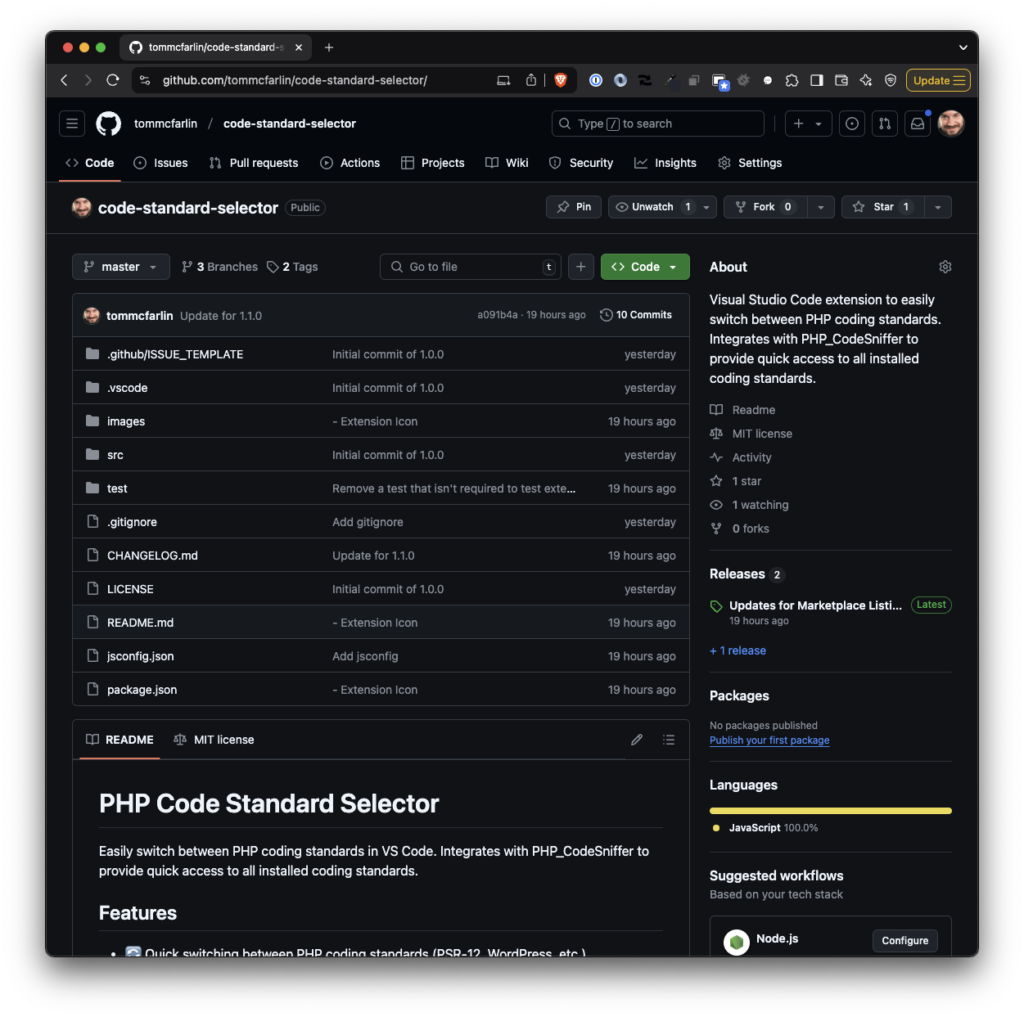
Code Standard Selector
PHP Code Standard Selector is a Visual Studio Code extension that makes it easy to switch your PHP coding standard without having to edit any settings in your IDE.
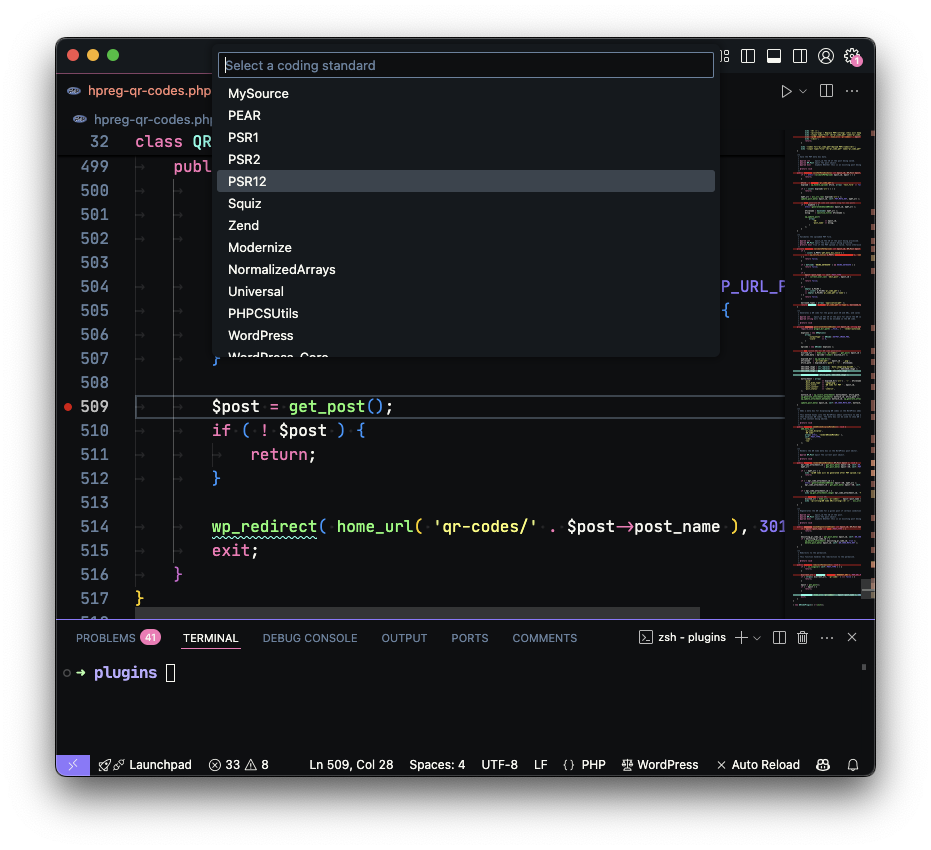
Using this extension, you can view and select the coding standards in three ways:
The command palette, type > Select Code Standard
A shortcut, CMD+ALT+S or whatever the equivalent may be on Windows and Linux,
The status bar, which shows the currently selected standard and gives you the ability to click on said standard to change the standard
All three of these options render the same menu: A list of all of the standards installed on your system. Once selected, the extension will then automatically set that standard as the active standard and apply it to your project.
Prerequisites
Note, however, there are a few prerequisites to use this extension. Code Standard Selector assumes – and requires – you have the following set up on your system:
PHP CodeSniffer is usually installed via Composer and PHP Sniffer & Beautifier (abbreviated as PHPSAB in Visual Studio Code) is installed via the Extensions Marketplace.
And if PHP CodeSniffer is installed at the project level, it’s easy enough to update the paths to phpcs and phpcbf in your User Settings or Workspace Settings.
Installing The Extension
You can find it in the Visual Studio Code Marketplace in your browser or searching for “Select Code Standard” in the Extensions Marketplace in the IDE itself.
Or, if you prefer, you can download the lastest vsix release from the GitHub repository (where you can also grab the code, open issues, feature requests, and all of the usual options provided by a repository).
How It Works
Select Code Standard will check to make sure that the PHP Sniffer & Beautifier is installed and, if not, prompt you to install it before allowing you to actually use the extension.
Obviously, installed that particular extension implies you have at least one set of coding standards installed on your system.
Once installed, Select Code Standard will then generate a list of all standards installed on your system (by using phpcs -i) and use that to render the list of available standards.
When you select a standard, it will then use the value of the standard to tell PHP Sniffer & Beautifier what to use and it will update the extension and status bar with the standard currently in use.
Example Configuration
If you’ve not used PHP Sniffer & Beautifier before and you’re looking to get up and running quickly, here’s an example of my configuration in settings.json:
Notice the line that contains phpsab.standard. This is the one that Select Code Standard will modify when you select your own standard from the extension’s interface.
Issues, Requests, Future Versions, etc.
I built this extension for me because I wanted to have an easy way to quickly change standards (and because I’d never built an extension for Visual Studio Code before).
If you’re a developer using PHP and have a similar set up – or are looking for a way to update your set up to something that works well with the aforementioned configuration – maybe this extension will help.
Finally, although the plugin can be automatically updated from within the Extensions Marketplace, each version will be released on GitHub prior to deploying in the marketplace. So if you typically follow – or star – repositories to track development, that’s an option.
With that said, I’m already using the Select Code Standard and it’s serving its purpose exactly as I need. If it works for you, great. And if you have issues, requests, or anything else, please open an issue.
I’ve recently switched to Laravel Herd for local development. It uses Valet internally, which I obviously like, and comes with a lot of tools out of the box that make some of the overhead of development much easier.
It’s a hard hard at work.
And any utility that makes it easy to focus on actually writing code while reducing anything that deals with reading logs, configuring different versions of PHP, and even debugging is something I’m in favor of using.
Off the shelf, Herd makes debugging with PHPStorm easy; however, if you’re to get started with Laravel Herd, Xdebug, and Visual Studio Code then there’s a little more configuration to do.
Laravel Herd, Xdebug, and Visual Studio Code
A Word About Herd Documentation
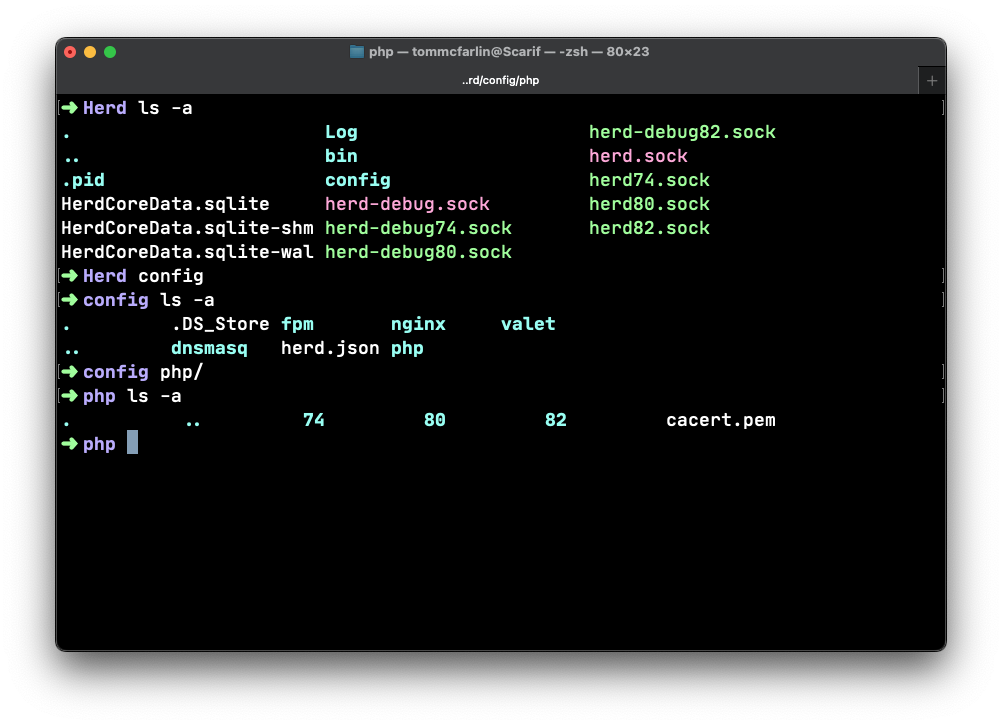
I want to point out I think Herd’s documentation and file structure is one of the best I’ve seen. It’s easy to understand, easy to navigate, and easy to find various configuration files – say php.ini or debug.ini – regardless of the version of PHP you’re using.
A quick example of the directory structure of how Herd organizes its files and configuration.
That said, there’s not much in the way of how to configure Xdebug and Visual Studio code.
Herd, Xdebug, and Code
Here are the steps what worked for me to get my local environment setup. Note this was tested with PHP 7.4, 8.0, and 8.2.
For the following example, note I’m using Apple Silicon and am going to be using PHP 7.4. Very few things should be different save for the paths to the files references in the below code.
HERD
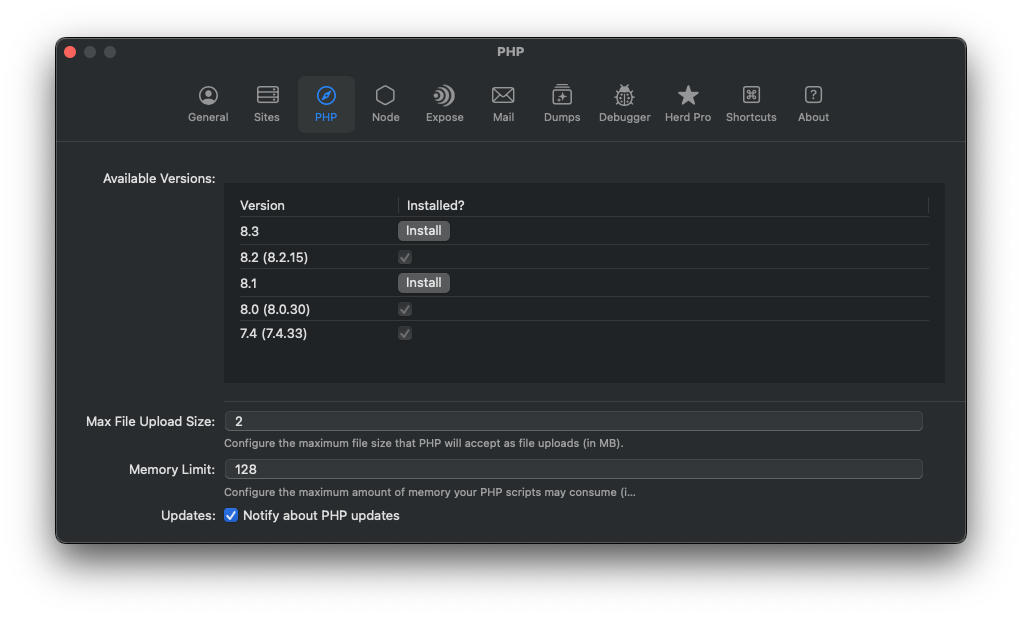
Changing PHP versions is trivial in Herd. This is a matter of selecting the version you want to install and/or marking it as active for your current site.
I mention this though, because it’s important to know which one you’ve got activated so you can properly update the relative Xdebug configuration.
XDEBUG
Unless you’ve set up Herd in some abnormal manner, you should find the extension in the following path:
From here, you want to open the relative php.ini file and add the following. Note that this is different than what the Herd docs show. I don’t know if it’s because they are specific to PHPStorm or not, but this is what worked for me with Visual Studio Code.
First, locate the php.ini file in the following path:
You should not need to touch the debug.ini related to the the PHP version in the same direction.
VISUAL STUDIO CODE
Finally, in Visual Studio Code, create a .vscode directory if it doesn’t already exist in the root of the project. Next, add launch.json to the directory.
You’ll likely need to restart Herd after this so issue the $ herd restart command in your terminal.
Conclusion
Now you should be able to set breakpoints, add watches, step into code, and all of the usual things you can do with the Xdebug but in a Herd environment.
If you’re to go through the archives of the content here, you’re going to find majority of articles dealing with PHP, JavaScript, HTML, CSS, and variations thereof and all of which will likely be around building solutions on top of WordPress.
But a couple of decades(!) ago, I was working with Python – and other languages – when I was in college. And given some side projects that I’m working on right now, I’m using it again.
This time, though, I’ve got an environment set up that I really don’t want to leave and I want to be able to easily go back and forth between working with PHP and related tooling to Python and similar tooling with as little context switching as possible.
having proper sniffers and fixers for coding standards,
easily generating docblocks for the code,
and more.
Though it’s obviously outside the content I normally write but given that I’m doing this more and more, I thought I’d share everything I’ve done to set up a Python development environment as a PHP developer.
Summary
If you’re curious about everything covered in this article, here’s a list:
Installing Python via Homebrew
Setting Up Visual Studio Code
Installing the Python Extension
Configuration the Python Environment
Python Coding Standards
Debugging Python Code
GitHub Copilot
Installing the Extension
Generating DocBlocks
Explaining Code
Conclusion
Resources
Visual Studio Code and Other Tools for Python Development
Installing Python via Homebrew
The majority of the software I install is through Homebrew and I’ve covered it more extensively in the article I wrote when I first set up the machine I use each day.
You can check to see if Python is already installed on your system by running $ which python on your machine. At this point, though, you’ll likely see something like python not found. This is because the Python binary is, at the time of this writing, is python3.
So run $ which python3 and if you’re given a path, then you’ve got it installed. If not, run the following:
$ brew install python
After this, you should be able to run:
$ python3 --version
And you’ll see the current version you’re running. For this article, I’m running 3.9.6.
Don’t Forget pip
pip is a Python package manager much like Composer is a PHP package manager so I’ve not found a reason not to install it.
It should be installed by default if you’ve installed Python via Homebrew. Make sure you’re running the latest version. To do this, enter:
$ pip3 install --upgrade pip
Once the process is done, the initial work for installing and setting up Python is done.
Setting Up Visual Studio Code
My goal is to make sure I can swap between PHP development and Python development as quickly as possible by just opening a new instance of the IDE.
Installing the Python Extension
To install the Python extension for Visual Studio Code:
Navigate to the Extensions you have installed (you can use cmd+shift+x on macOS to do this.
If Python is not already installed, search for python and make sure it’s the extension that’s authored by Microsoft. Install it and, if requested, restart Visual Studio Code.
Before getting started with Python in Visual Studio Code, there are still a few things to do.
Configuring the Python Environment
If you’re like me, then whenever you restart Visual Studio Code, it’s going to have Python installed but still look and function much like it would any other time you open it. That is, it’s going to act like it’s a standard PHP editor.
Things change whenever you want to start a new Python-based project (be a single file or something more complex).
Select the Python Interpreter you want to use in your projects. To do this, open the command palette by first pressed cmd+p then typing “Python: Select Interpreter“. Essentially this is asking which version or which binary, of all those that may exist on your system, do you want to use when running your code. Depending on your set up, you’ll see a number of different options (one will also be Global and one will also be Recommended). I favor the Recommended option because it should be the one provided by Homebrew (though it’s possible to have both Global and Recommended be the same, too).
You can now create a new Python file or open an existing one. The Python extension provides various features, including code highlighting, code completion, linting, debugging, and more.
If you opt to create a new file, you’ll need to choose an environment type in the current workspace. There are two types, Venv and Conda. What you opt to use depends on your needs. For the purposes of this article, I’m using Venv.
At this point, Visual Studio Code is ready for Python-based projects along with everything that comes with the environment. This includes IntelliSense, debugging, and running scripts.
But if you’re coming from another development background, you know there’s more to do such as debugging code, coding standards, sniffing and fixing code, docblocks, and and using modern tools like GitHub Copilot to help with any, all, and more than the above.
Python Coding Standards
As is the same with other programming languages, Python has it’s own set of coding standards. When it comes to using Python, all of this is already built into the extension out-of-the-box so there’s very little that we have to do.
PHP Coding Standards, DocStrings, etc.
First though, it’s worth knowing where to look should you need to reference something just in case. At least this is what I find to be the case whenever I’m curious about some standard or decision the plugin makes when it formats my code. Here’s a concise list of resources I have available:
Assuming you’ve got a file set up in Visual Studio Code, call it hello.py or whatever you’d like, and you’ve selected Venv (or Conda, should you so choose) as your environment of choice, then you’re ready to start writing code, formatting it, and adding inline code to it.
First, in your settings.json file, make sure that you’ve added the following directives:
This will ensure that even if you miss any formatting in the document, it will format it whenever you save it.
Secondly, start by writing a basic function that’s essentially the classic Hello World except it will accept a string and say Hello to whatever you pass to it.
def hello(str):
    return "Hello " + str + "!"
Obviously this function won’t do anything until it’s invoked. So it’s possible to either just invoke the function by using print or we can get a bit more involved with Python and look at how to accept command line arguments while building out this functionality.
Let’s do the latter. To do this, we’ll need to import the sys package and then look at the arguments that are passed to the script. A very rudimentary way of doing this is to look at the arguments and blindly accept the first argument as the the name.
Now when you run the script, you can run $ python3 hello.py Tom and the output should simply be “Hello Tom!”
But, as mentioned, there are a lot of problems with this implementation the least of which is not blindly accepting output. I’ll come back to this point later in the article.
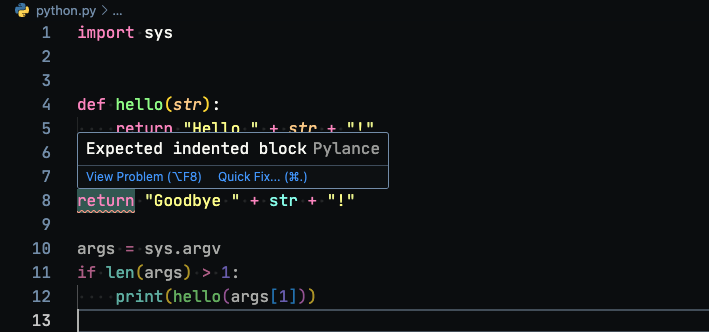
Before finishing, let’s add one more function that’s formatted like this:
def goodbye(str):
return "Goodbye " + str + "!"
Functionally, this looks fine but it’s ill-formatted per the Python coding standards and if you’re editor is properly set up, then you should see something like the following image:
When you hover over the underlined code, you’ll see a message that reads Expected indented block. So indent the block per the coding standards and you should be good to go.
Finally, update the main file to say goodbye so that it looks like this:
When working with PHP, it’s a bit of work to get Xdebug set up and working and configured in Visual Studio Code. It’s not has bad as it once was, but it’s also more of an involved process than it is in Python.
Out-of-the-box, the Python extension for Visual Studio Code handles the majority of this for us. Instead of having to configure any third-party module, enable it in a configuration file, then set up a configuration in the IDE, we simply set breakpoints, add watches, and all of the usual actual debugging tasks in Visual Studio code. Then we just tell the editor to Run and Debug.
But given the code above, we can’t simply press a button and run because it’s expecting input from the terminal. There are two ways to handle this.
We can set up an else so that it defaults to an empty string,
We can edit the code inline during debugging.
Each of these are useful in their own context.
Set Up a Conditional
The easiest route is to first set up an else case. The block of code may not look like this
Now if you run the script from the command line, you should see it output Hello World! It should also output Goodbye World!
Now if you set a breakpoint on either of the function calls, let’s say print(hello("World")) and start the debugger, you’ll see the familiar interface that you see when debugging PHP.
From here, you can do the usual debugging behavior. If you’ve set the same breakpoint as I’ve set above, then click on Run and Debug and you should see see the debugger hit breakpoints, add variables to the Watch list, and all of the usual inspections that you can do to variables, function calls, and so on.
But if you’re debugging arguments that come in via the command-line, what then?
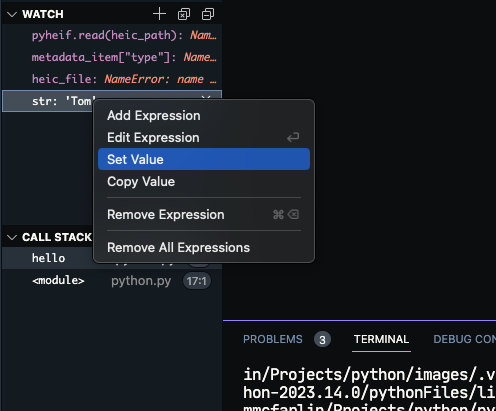
Edit Values Inline
I don’t know how often you’ve done this in the past but I’ve find when working with web applications, this can be extremely useful especially with data coming in from another source (like a POST request).
To do this in Visual Studio Code, simply set a breakpoint as you normally would. Assuming you’ve got a variable name set in the Watch list and the breakpoint is on the line where the variable is invoked, then you can modify it by two-finger Set Value.
This will allow you to change the value in real time and then see the output of the result once done. And if you want to do this with command-line arguments, then set a breakpoint and a watch when args is set and change the value to ['...', 'Tom'] and you’ll find that you’ve now simulated updating command line arguments.
This particular extension has made it easier to more quickly understand code when I’m lacking context, generate docblocks faster and more concisely than I normally can, and even recommend suggestions for making sure I’m following best practices regardless of what I’m doing.
But in the context of using Python especially as someone who’s more rusty on it than other languages, I’ve found it extremely helpful when bringing me up to speed when I want to achieve something (such as how to retrieve command line arguments).
To do this, though, we need to install and configure the extension.
Installing The Extension
First, I recommend installing both of the following:
GitHub Copilot. This utility is primarily focused on helping developers write code more efficiently by providing intelligent code suggestions and autocompletions based on the context of their code. It is designed to enhance the developer’s coding experience.
GitHub Copilot Chat. GitHub Copilot Chat beta provides a natural language chat interface to engage with GitHub Copilot, an AI developer tool or “AI pair programmer,” and get coding information and support for tasks from explaining code to finding issues and fixing them.
Note this is free for open source projects. If you’re working on anything that’s licensed as such, then there’s no need to pay; however, if you’re working on anything that’s closed source, it costs money.
Further, note that whatever license you use, make sure you pay attention to the settings GitHub asks as it will ask if it can use your source code to training their language model. For some, it’s not a big deal; for others, this isn’t something you want to do; however, if you’re working in open source, it’s probably expected to share it.
If you’re ensure and you’re not self-employed or you’re using it for an official project for your employer or for someone else, then be sure to ask them.
Generating DocBlocks
Assuming you’ve got GitHub Copilot and Copilot Chat installed, here’s how you can use it to quickly generate aspects of your code that are generally mundane (such as DocBlocks).
Looking at the following function:
def hello(str):
    return "Hello " + str + "!"
Let’s ask Copilot to generate a docblock for it. There are two ways to do this:
You can ask Copilot to generate it inline using a menu item and then ‘accept’ the results to have them automatically inserted.
You can ask Copilot Chat to generate it and then copy and paste the results into the editor.
We’ll look at an example of the latter in the next section so let’s use the first option to generate a docblock.
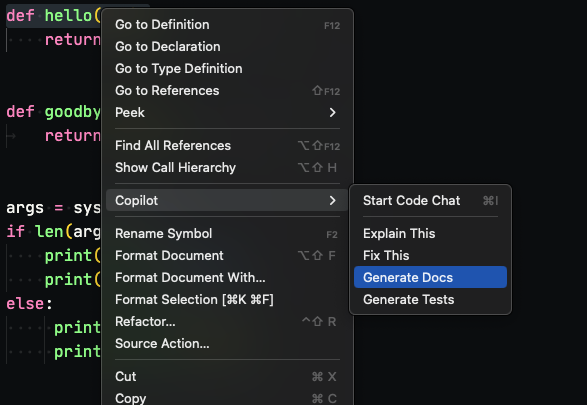
First, two-finger click or right-click on the function signature and select Copilot > Generate Docs.
Once it’s done processing the code, you’ll likely see something like this:
For the purposes of this acrticle, I’ll accept it. Once done, your function should look something like this:
def hello(str):
    """
    Returns a greeting message with the provided string.

    Args:
        str (str): The name or string to be greeted.

    Returns:
        str: A greeting message with the provided string.
    """
    return "Hello " + str + "!"
You can do this for the rest of the functions in this file or whatever file on which you’re working. In addition to making this much quicker, it also follows the coding conventions of Python so you don’t have to tweak it after the fact.
Explaining Code
Now let’s use Copilot Chat to explain a section of code in the chat window provided by the extension. Since we know how to generate documentation, let’s use the feature to explain the conditional we have.
Select the block of code in Code, then click on the Copilot Chat icon in the Activity Bar. Next, you can either prompt it with something like “Explain this code” or you can use one of the built in commands it offers such as /explain.
If you use the latter, it should return a lengthy response. Something like this, perhaps:
This Python code reads command-line arguments using the sys.argv list. If there is more than one argument, it calls the hello and goodbye functions with the first argument and prints the results. If there is only one argument, it calls the same functions with the string “World” and prints the results.
The hello function takes a string argument and returns a greeting message that includes the argument. The goodbye function takes a string argument and returns a farewell message that includes the argument.
This code demonstrates how to use command-line arguments in Python and how to call functions with arguments. It also shows how to use conditional statements to handle different cases based on the number of arguments passed in.
To improve the readability of this code, we could add comments to explain what each part of the code does. We could also use more descriptive function and variable names to make the code easier to understand. Additionally, we could use f-strings to format the greeting and farewell messages instead of concatenating strings.
If you want to make the code more succinct, leave the block of code highlighted then prompt Chat with “Make this code more succinct.” It should return something like this:
And for good measure, let’s ask it to generate a single-line comment to explain what this block of code is doing. We can use a more specific prompt such as “Explain this in a single line comment.”
The first result may be something like this:
This Python code reads a command-line argument and calls the hello and goodbye functions with the argument, or “World” if no argument is provided, and prints the results.
But given that I’m coming from a PHP background, I’m used to inline comments being no more than 120 characters so I’ll prompt Chat with the following: “Shorten the last answer to no more than 120 characters.”
Then it returned this:
Python code reads command-line arg, calls hello and goodbye with arg or “World” and prints results.
And since we’re in Python, we can remove the “Python code” phrase and just go with:
Reads command-line arg, calls hello and goodbye with arg or “World” and prints results.
The final version of your IDE may look something like this.
And that’s it for the initial primer on how to use Visual Studio Code and Other Tools for Python Development.
Conclusion
I obviously contend that AI is more of an assistant to writing software than anything else, but I found this to be a unique case to document. This covers how to use things such as GitHub Copilot and Copilot chat, but also how to set up a new language in Visual Studio Code and leverage modern tools to get easily onboarded or get brought up to speed on how to do certain things in the language.
It’s easy to feel utility to technology fatigue with so much happening in our space. Each month, it seems as if there’s some new pre-processor, linter, JavaScript utility, security analyzer, or something else that promises to make us more product or write better code or get things done in such a way it’s more maintainable.
Perhaps some or all of that is true.
But in all of the years of writing web applications, I’ve yet to really find anything that’s increased productivity and learning so much as I have with using GPT-based tools. And though it’s useful in my day-to-day work in writing PHP and related code, it’s also been extremely useful in getting up to speed with writing, debugging, documenting, and being brought up to speed on Python, too.
Since there are a few extensions I’ve wanted to try out that aren’t available for Visual Studio Code’s stable builds, I’ve been using Visual Studio Code Insiders for the last few weeks.
The main difference is that this version is a daily release versus the standard monthly release and certain plugins, like GitHub Copilot Chat, requires the daily builds for it to run.
Here’s the thing, though: If you have settings you want to preserve across installations and Settings Sync doesn’t do the trick (I had hit or miss success with it across the two editions of the IDE), then here’s a simple trick for symbolically linking extensions, settings, and keybindings across editions.
I don’t normally do retrospectives for each year for products, posts, work, or anything.
Given that I didn’t write as much as I have in years passed, I thought I’d share what the most popular articles I’ve shared over the last year in hopes of both of surfacing some older content but also setting the tone for the coming year.
Kinsta offers premium managed WordPress hosting for everyone, small or large. Powered by Google Platform and strengthened by Cloudflare, they take performance to the next level. All hosting plans include 24/7/365 support from their team of WordPress engineers. Get startedwith a free migration today.