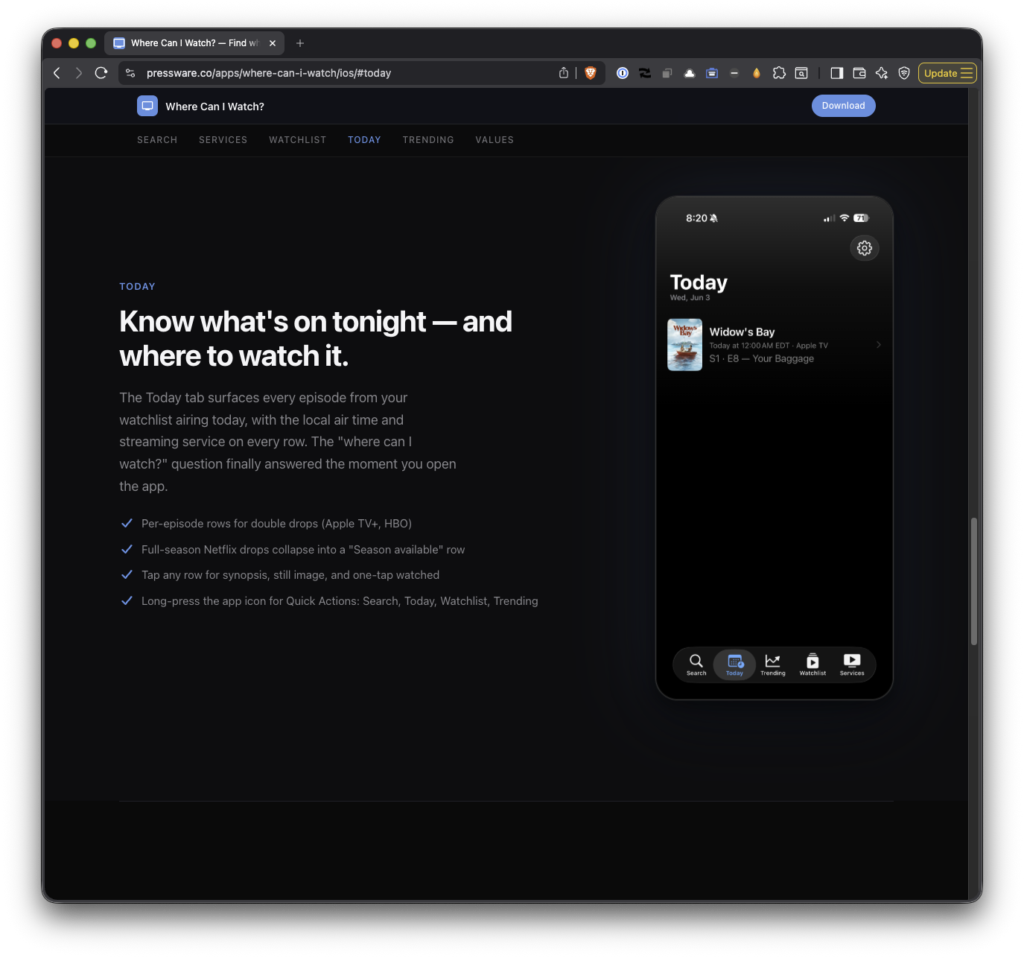
Software Engineering in Web Development, Backend Services, and More

Category: Projects (Page 2 of 35)

Posts introducing, updating, and covering various projects to which I’ve contributed or that I maintain.

Now Playing Notify: The Notifications Spotify Didn’t Ship

Spotify is my preferred music streaming app primarily because it’s discovery algorithm is second-to-none. But there’s one thing the macOS app doesn’t do that I wish it did (and that third-party apps used to do but have since, apparently, languished): tell me what’s playing.

I spend most of my work day with music running in the background. Spotify lives somewhere behind a dozen windows, and unless I deliberately click over to it, I have no idea what track just started. Sometimes I’ll hear something and think “what is this?” then forget to check because I’m working on something else. By the time I remember, three songs have passed and it’s gone.

Yes, I know the iOS app shows a Now Playing widget. And yes, Control Center on the Mac technically shows media info. But neither of those send me a notification when a new track starts. I don’t want to check something. I want to be told.

So I built Now Playing Notify.

Continue reading

Session Stash: Save Browser Tabs with One Click

“I’ve got too many tabs open” or “something something too many tabs across too many browser instances.” It’s a common phrase for a lot of us.

For me, maybe they are for research for a project, a handful of articles I’ll “read later” (even if I have a “read it later” app already), or just the accumulated debris that’s happened throughout the week.

Then I get prompted for an update. Maybe it’s for the browser itself or maybe it’s for the operating system. Regardless, either one requires a restart and though I read “we’ll restore your tabs after the restart,” I find this doesn’t happen consistently.

Maybe its PEBKAC. If that’s the case, though, maybe the solution can EBKAC, too.

The core problem is this: Closing everything means losing context. Sure, it’s possible to bookmark each tab individually, but that’s tedious. I could use a session manager extension, but most of them do far more than I need.

So I built Session Stash.

Continue reading

Updates To TuneLink: Relocation, UI Updates, and an API

About nine months ago, I wrote a case study about building TuneLink – a web app that converts music URLs between Spotify and Apple Music. The original post covered everything from the matching algorithms to the tech stack to my thoughts on using AI as a development accelerant.

Since then, I’ve made a few updates:

  • the domain moved,
  • the UI got a complete overhaul,
  • performance was optimized for both desktop and mobile as benchmarked by Lighthouse

And I’m currently toying with the idea of converting it into a small service that will expose an API of sorts to allow third-party (well, very limited third-party) access to the site.

If you’ve been using TuneLink or just read about it last year, here’s an update.


Why Change Domains?

TuneLink originally lived at tunelink.io. It now lives at tunelink.tommcfarlin.com.

Why, though? Consolidation and frugality. I have a handful of small utilities and side projects scattered across various domains, and maintaining them all separately was getting tedious. Plus, I don’t want to pay for domains (or other infrastructure) for projects that aren’t yielding any type of return to support them.

Moving TuneLink under my personal domain simplifies things – one less domain to renew, one less set of DNS records to manage, everything lives under a single umbrella, and it costs less.

The functionality hasn’t changed. If you had the old URL bookmarked, you’ll want to update it. Otherwise, everything works exactly as it did before.

The UI Redesign

The more noticeable change is the interface itself. The original TuneLink was functional but utilitarian – a white background, basic input field, and straightforward result display. It worked, but it didn’t exactly feel like something I’d want to use repeatedly. It looked like a standard developer UI but in dark mode (and that’s not a good thing).

The new design is darker, cleaner, and more visually interesting. It actually feels like a more modern single-page web app rather than a quick prototype.

Beyond aesthetics, I added a few quality-of-life improvements:

  • Service-aware theming: The UI subtly shifts colors based on whether you’re converting from Spotify or Apple Music.
  • Loading feedback: Instead of a blank screen while waiting for results, there’s now visual indication that the app is working.
  • Deep linking: Buttons to open the matched track directly in the Spotify or Apple Music app, with fallback to web if the apps aren’t installed.
  • Better error messages: Clearer feedback when something goes wrong, whether it’s an invalid URL or a track that doesn’t exist on the target platform.

The deep linking piece is particularly useful on mobile. Previously, you’d get a URL, copy it, and manually navigate to your music app. Now you can tap a button and go straight to the track.

What’s Coming Next

The most significant change on the roadmap is making TuneLink’s matching functionality available as a service that other applications can use.

Right now, the only way to convert a music URL is to visit the website and paste it into the input field. That’s fine, but it’s not the only context where this kind of conversion is useful.

Think about clipboard managers, menu bar utilities, or automation tools. Imagine copying a Spotify link from a message and having your system automatically offer to open it in Apple Music instead. Or a keyboard shortcut that converts whatever music URL is in your clipboard and opens the result in your preferred app.

These are the kinds of workflows that don’t need a web browser. They belong in lightweight utilities that run quietly in the background.

To make that possible, TuneLink will expose a simple endpoint that accepts a music URL and returns the matched URL on the other platform. Any application that can make a web request will be able to use it. Of course, I may just lock this down with my own credentials for the obvious reasons that come with exposing a publicly available API.

Regardless, the foundation is already there. The matching logic that powers the website is the same logic that will power the service.

I’m also considering batch conversion for handling multiple URLs at once. My thought process is that it would be useful for anyone wanting to convert entire playlists rather than individual tracks.

Conclusion

TuneLink is a small utility that solves a small problem and was built primarily as a vehicle for learning. It doesn’t need to be more than that. But making it more accessible – through a better interface and availability to other applications – means it can fit into workflows beyond just visiting a website and pasting a URL.

If you’ve used it before, update your bookmark. If you haven’t, give it a try next time someone sends you a music link from the wrong platform or a platform that you don’t use.

Easily Backup and Sort Apple Photos, Videos, Media, and AI Content

Like most, the majority of files (project files, photos, videos, etc.) are all backed up to the cloud each day because, you know, just in case. But I treat my photos and videos a bit different. Yes, I have daily backups, but I handle my monthly backups a little bit differently.

Roughly 20 years ago, I lost all digital photos and videos that I’d had taken since digital cameras and cell phones with cameras became mainstream. The short of it is that I had all of that data backed up on two external hard drives. One was always connected to my machine, the other was sync’d periodically, because redundancy is important, right?

But fires don’t care about redundancy.

Since then, it would be an understatement to say I’m extremely particular with my backup process especially as it relates to photos and videos. And even more so since we’ve had kids.

Anyway, the gist of my process for backing up photos and videos from Apple Photos roughly follows this process:

  1. Export all images and videos from the last month
  2. Convert all HEIC to lossless JPEG
  3. Separate HEIC, JPEG, video, screenshots, AI generated images, etc. in separate directories
  4. Name the files based on the date contained in the EXIF data (or the closest approximation from file creation or modification)
  5. Rsync this both with a local, external drive and a cloud backup service.

The most time-consuming part of the process are steps two through four. The rest are ideal for automation via local scripts and programs.

So to make the process a bit easier, I have a Monthly Backup utility I use help take care of the entire export. And maybe it’s something useful for others, too.


Backup and Sort Photos, Videos, Media, and AI Content

As the repository states:

A utility for easily backing up photos, videos, and screenshots from Apple Photos library.

When you export unmodified photos from your Apple Photo library, you place them in an export directory in the root of the project. Then, after setting up the Python virtual environment and installing the dependencies, run python -m src.main and you’ll have all of the files organized into subdirectories:

  • photos/ – actual photos with proper EXIF timestamps
  • videos/MOV, MP4, and other video files
  • screenshots/ – iOS and macOS screenshots automatically detected
  • generated/ – AI-generated images and heavily edited content
  • unknown/ – anything that doesn’t fit the other categories

They’ll also be renamed based on the EXIF or metadata timestamps for ease of organization. The format is simple: YYYY.MM.DD.HH.MM.SS, which makes chronological sorting trivial.

And if you’re curious to see how your content will be processed, you can run python -m src.main --dry-run to see what will be processed and how it will be organized. This way, you’ll know if this is – or isn’t – the right program for you before making any changes to your files.

Installation

Three steps: clone the repository, create the virtual environment, install the dependencies.

Or, in other words:

# Clone the repository
git clone https://github.com/tommcfarlin/tm-monthly-backup.git
cd tm-monthly-backup

# Create the virtual environment.
python3 -m venv tm-backup-env
source tm-backup-env/bin/activate

# Install the dependencies.
pip install -r requirements.txt

Then you can run the program. I typically use it once a month, as stated, after exporting that month’s photos and videos from iCloud, but you can run it as frequently or infrequently as you want.

More Technical Details

The remainder of this this article covers how the program actually works, how to use it, and how you can fork it, report bugs, or add features.

Sorting Types of Files

The program does more than just move files around. It actually looks at the content and makes intelligent decisions about how to handle it.

Images

For HEIC files, it converts them to high-quality JPEG while preserving all the EXIF data. Apple’s sidecar files (those .aae files that come along for the, ahem, ride) get cleaned up automatically since they aren’t needed when the conversion is done.

Videos

Video timestamps are extracted from the actual video metadata, not just the file creation date. This matters because if the file has been copied or moved, the filesystem date might be wrong, but the embedded metadata in the video file itself is usually accurate.

AI Content

The AI content detection is particularly useful (and something I didn’t really need until recently, for obvious reasons). Images from ChatGPT or other AI tools are automatically separated into the generated folder. It looks for C2PA metadata, UUID-style filenames, and other signals that something was generated rather than captured with a camera.

Screenshot detection works by recognizing iOS and macOS patterns. Those IMG_3XXX.PNG files or anything with “Screenshot” in the name gets sorted appropriately.

When there are duplicate timestamps, which happens especially when burst mode has been used, the tool increments the seconds to keep everything unique. And if a file is missing EXIF data entirely, it falls back to filesystem timestamps and will generate a note about this in its output.

Usage

Assuming you’ve already installed the program, here’s a few notes on how to use it.

The utility expects your exported files to be in an export/ directory and will create a backup/ directory with all your organized content. If you want to see what it’ll do before committing, that dry-run flag is your friend.

For debugging or if you’re just curious about what’s happening under the hood, there’s a verbose mode: python -m src.main --verbose. It’ll show you all the processing details, which is helpful if something isn’t working quite right or if you want to understand how a particular file got categorized.

The whole thing is built with proper CLI conventions, so python -m src.main --help will give you all the options if you need a reference.

Obligatory Contribution Note

If you’re backing up Apple Photos and related media on a regular basis and find the manual organization tedious, feel free to check it out on GitHub.

The code is MIT licensed, so you can use it, modify it, or ignore parts you don’t need. And if you find issues or have suggestions, pull requests are always welcome.

« Older posts Newer posts »

© 2026 Tom McFarlin

Theme by Anders NorenUp ↑