You should be well-versed in the refactoring we’re doing regarding the WordPress Widget Boilerplate. If not, I recommend catching up on the series thus far by:
- reading the previous post,
- or reading the entire series up to this point,
- and looking at the development branch of the project on GitHub.
As far as the code base goes, we’re in a good place right now. We’ve begun to refactor much of the code into smaller, more focused classes. And we’ve just set up a Registry so that we can begin working with instances of objects throughout the plugin without the need for too much coupling.
But there’s still a problem we’re facing and it deals with namespaces and autoloading. I’ve talked a bit about this a couple of years ago but not as it relates to Composer.
And that’s what we’re going to look at in this post.
The WordPress Widget Boilerplate: Refactoring, Part 6
In the second post of this series, we started talking about Composer. If you ask most PHP developers (including those who work WordPress), you’re likely to hear that Composer is a package manager or a dependency manager.
In short, it’s a way for us to bring third-party libraries into our project and then utilize their features (so we don’t have to write our own code to do so).
But there’s another feature that Composer offers that’s of immense utility especially when you’re using a lot of classes and don’t want to use require_once statements throughout your code base.
And that’s the autoloader.
The Autoloader Defined
Straight from the manual:
For libraries that specify autoload information, Composer generates a
vendor/autoload.phpfile. You can simply include this file and start using the classes that those libraries provide without any extra work:
If you’ve been following along with the code thus far, then you’ll see we’re actually already using the autoloader generated by Composer.
First, we defined the necessary configuration:
Then we started to include it in the plugin’s bootstrap (which we’ll finalize today):
But there’s a problem here: How do we load just the classes we need for distribution?
To put it another way: There are a lot of libraries we’re using in development to ensure that we’re writing high-quality, standards-compliant code. But we don’t want to distribution 10MB of data to those who use our project.
Instead, we need to include only the files that are required, right? And to do that, we need to make sure that we generate an autoloader that we can include that does just that.
First, I’ll show you the command then explain what all it does:
This will generate just what we need for our project to work for a production environment. Here’s what each flag does:
- composer install. This simply installs all of the dependencies. If you already have a number of them in your vendor directory then this will remove all except those that are required.
- no-dev. This will prevent Composer from installing the packages in the require-dev section of its configuration files (namely, dependencies that we’re using with GrumPHP).
- no-ansi. This prevents any ANSI output from occurring. You may not care to run this or not. If you opt to do some type of auto-deployment, then use it; otherwise, it can be omitted from the command.
- no-interaction. This is another flag that’s used specifically for environments in which you want to automatically build the project and not have to engage with any questions, output, and things like that.
- optimize-autoloader. In short, this generates a faster autoloader. It may take a little while to run depending on the size of your project but it pays off when launching your work.
- no-progress. This hides the progress bar from showing in the terminal. You may actually want to see this and, if so, that’s great; however, some environments may not handle certain characters (such as backspace) well.
- prefer-dist. This will make sure that the packages that are installed are done so using the distribution version (versus something that’s less stable).
Still Interested?
If you’re really curious about optimizing the autoloader for projects outside of this post, then I recommend reading this page in the Composer documentation. It’s outside the scope of what we’re doing here but it may come in handy with other work that you have now or that you do in the future.
What’s This Look like in the Boilerplate?
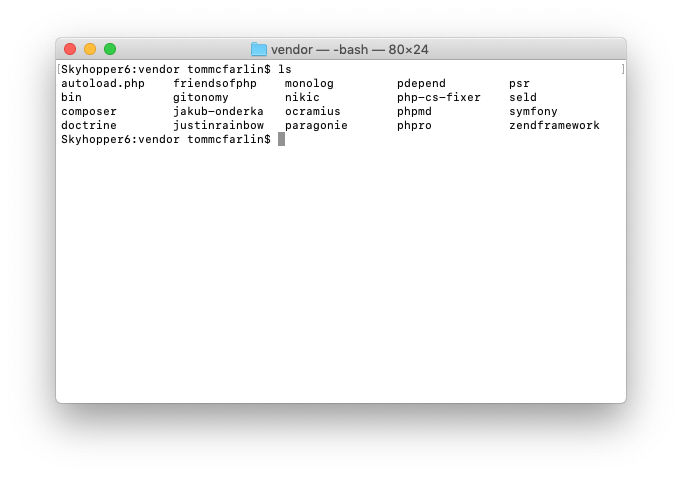
If you’re working on the Boilerplate on your local machine then you may see something like this:
But if you run the command that’s included above, you’ll then see something like this:
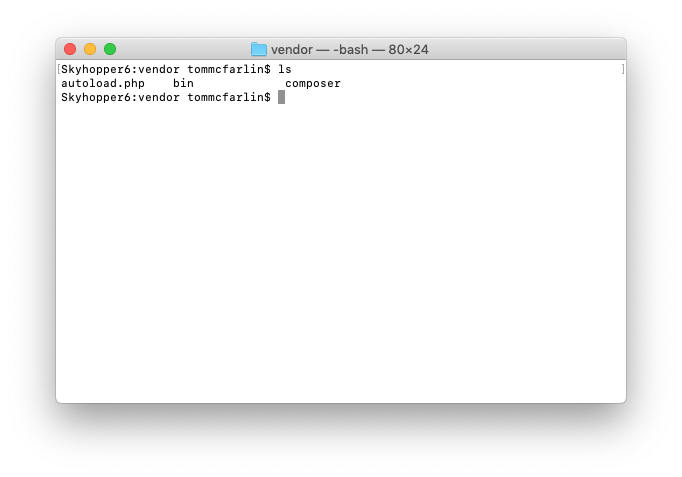
That’s a big difference and this is a small project. Imagine doing something much larger that’s going to run in production.
Speaking from experience, I can tell you that projects can quickly hit 20MB or more of dependencies if you’re using a variety of third-party libraries for things such as logging, HTTP requests, and code quality tools.
Will We Include in Our Vendor Directory?
People will often say that you should not include the vendor directory in source control and with good reason: It can be huge.
Even the Composer documentation talks about this:
The best practice is to then have all the developers use Composer to install the dependencies. Similarly, the build server, CI, deployment tools etc should be adapted to run Composer as part of their project bootstrapping.
So what are we supposed to do? We need the autoloader and we need certain dependencies because our users won’t know to run (nor should they have to run!) Composer whenever they download our work.
Because of the nature of WordPress and the work we’re doing, then we’re going to need to commit the vendor directory but only with very certain requirements.
- We’ll create a branch that will be used for release (we’ll creatively call it release and we can merge develop into it whenever needed).
- We will make sure that the vendor directory is not part of the gitignore file; however, we’ll make sure that the .git directories within the vendor directory is ignored (that can still take up a lot of space).
So let’s do each step and see how it looks when we’re done.
Creating The Release Branch
To create a new branch from within terminal, enter the following command:
This will take all of the code on which we’re working and then create a new branch with it. Since this will be the branch we use to act as what our users will use (we’ll talk about master in a future post).
First, review your composer.json file and make sure that it includes the following:
Now we need to make sure that we run the above Composer command to make sure that nothing but what we need is in the vendor directory.
Now we need to update gitignore.
Updating What We Ignore
And if you’ve followed along both with the series and the post this far, then you know it will look something like this (it may include more or less but should include at least this).
For me, this looks like the following:
Depending on if you’re using a terminal or a client, you’re going to see that there are new files to commit (from the vendor directory, specifically). So add those to your branch.
Then commit your changes. You may have to specify the following if you’re working in the terminal:
And with that, your code should work and be available on GitHub (or whatever source control service you’re using). You can see what I have available here.
Adding Functionality
Now that we have all of the necessary pieces in place, it’s time to start using Composer, the autoloader, our abstract classes, and our Registry to begin adding some basic functionality to the WordPress Widget Boilerplate so that we have something to show for our work.
For those who are curious, right now I’m planning to keep the branches organized as such:
- master will be what’s available for anyone and everyone who wants to build a WordPress Widget,
- develop is strictly for developers include those who know how to use Composer and the topics discussed in this post,
- release is what will be used to provide a working demo.
For now, though, review what’s covered in this post and we’ll resume this in the next post.