In the previous post, we began to implement the interface that we’re using to help guide our integration with the WordPress Settings API. The problem is, we’re not yet at a point where we can see the result of our work in the WordPress dashboard.
But at this point, we’re at a point where we can begin adding an interface for our plugin, but we can also define a class that represents the dashboard.
Additionally, we can have our Acme_Company_Name class not only implement the interface we’ve defined, but we can extend the the class that we’re going to create – that is, we can inherit from it so that we gain some of its properties and methods (if needed).
It sounds like a lot of work and though we’ll be adding several new files and adding a bit more code, we won’t actually be writing that much code.
The WordPress Settings API
Remember that the advantage of using the WordPress Settings API is that we get to inherit a lot of the native styling and functionality of the core WordPress application.
It also makes it easy for us to handle sanitization of user input, read data from the database, and more.
Right now though, we have a class that represents a single setting and although that’s useful, it doesn’t really position us for taking full advantage of the API let alone displaying anything in the dashboard.
So the next thing that we need to do is create a class that represents the dashboard functionality of our plugin.
Creating The Dashboard
When it comes to creating the dashboard – or an admin page, as others call it – there’s really only so many things that you want to do:
- Add the options to a menu (sometimes a new menu, sometimes an existing menu).
- Render the views that are associated with the page (more on this in a minute).
- Register the settings such as the ones that we’ve created thus far
Here’s a class, Acme_Company_Dashboard, that I’m using to represent the Dashboard that will eventually appear within the overall WordPress dashboard. I’ll cover each method after we look at the code:
First, notice that there is a protected property called views that’s set in the constructor of the class. This is done for convenience so that we can easily access the views directory that will hold the front-end of our settings page.
Next, I have a run method in which I’ve hooked a custom function, add_menu_items, to admin_menu so that I can add the plugin to the existing Tools menu in WordPress. Note that this function makes a call to another function in the class: display_acme_company.
In this method, we’re including the file that will be displaying the administrative functionality of the plugin. In the previous article, we referred to this file as 4-display-front-end.php.
Yesterday, we defined a file – 4-display-front-end.php – that’s responsible for actually rendering out the results of our work. The problem is that we don’t actually have a way to display this whenever the plugin executes.
Finally, there’s a method called create_settings that will use all of the classes that we’ve created thus far (which is really just a single setting, Acme_Company_Name) to display them in the dashboard page.
Though it’s not that much code, there’s a lot happening here and we’ll see it all in action once we create the bootstrap file for starting the plugin later in this article.
Extending The Dashboard
In the previous step, we defined a class from which we can inherit functionality into our Acme_Company_Name class. Before we do that, I think it’s worth taking a look at what it means to extend something in PHP.
Straight from the PHP manual:
The extended or derived class has all variables and functions of the base class (this is called ‘inheritance’ despite the fact that nobody died) and what you add in the extended definition.
Just as the quote says, the act of extending another class is an act of inheritance. This means that any functionality that’s public or protected is accessible via a class that inherits its functionality.
Anything that’s private is solely relegated to the implementing class.
So anyway, why would we want to do this? In our case, there are two reasons:
- Conceptually speaking, our `Acme_Company_Name` is a setting that is part of the `Acme_Company_Dashboard`.
- There are properties in the `Acme_Company_Dashboard` like `$views` that we may want to access within our `Acme_Company_Name` class.
And that’s exactly what we want to do. So in order to extend the class that we’ve just defined, we update our class definition to look like this:
Arguably the most important thing to note here is that the extends keyword must come before the implements keyword. Those are the rules of PHP by which we must play.
Now we can revisit our display function and tell it to display an input field for our company name:
Notice here that I’m making a call to a file in the partials directory called company-name.php. Obviously, this implies that I have a partials directory located in my views directory and it contains a file called company-name.php that’s displayed within the context of 4-display-front-end.php.
Your code doesn’t have to look like this right now. That’s fine! Everything can be in the root directory. We’ll be cleaning this up in the next article, anyway so don’t worry too much about it.
That sounds like a lot, doesn’t it? And it is. Sometimes, trying to cover things like this in a straightforward manner leaves me asking you to be patient until the next post in which I’ll show off the entire directory structure so you can see how all of the pieces fit together. I don’t really like doing that, but there’s only so many ways to tackle this issue and this is how I’ve opted to do it.
In the mean time, the most important things to be taking away from this post is the act of inheritances (via the extends keyword) and how subclasses can access properties of the base classes.
Unfortunately, we still can’t actually see anything happening in the dashboard. Let’s change that.
Displaying The Dashboard
To do this, we need to create a plugin bootstrap file that will include all of our necessary files and will then start the plugin. To do this, create a file in the root of the plugin directory that looks something like this:
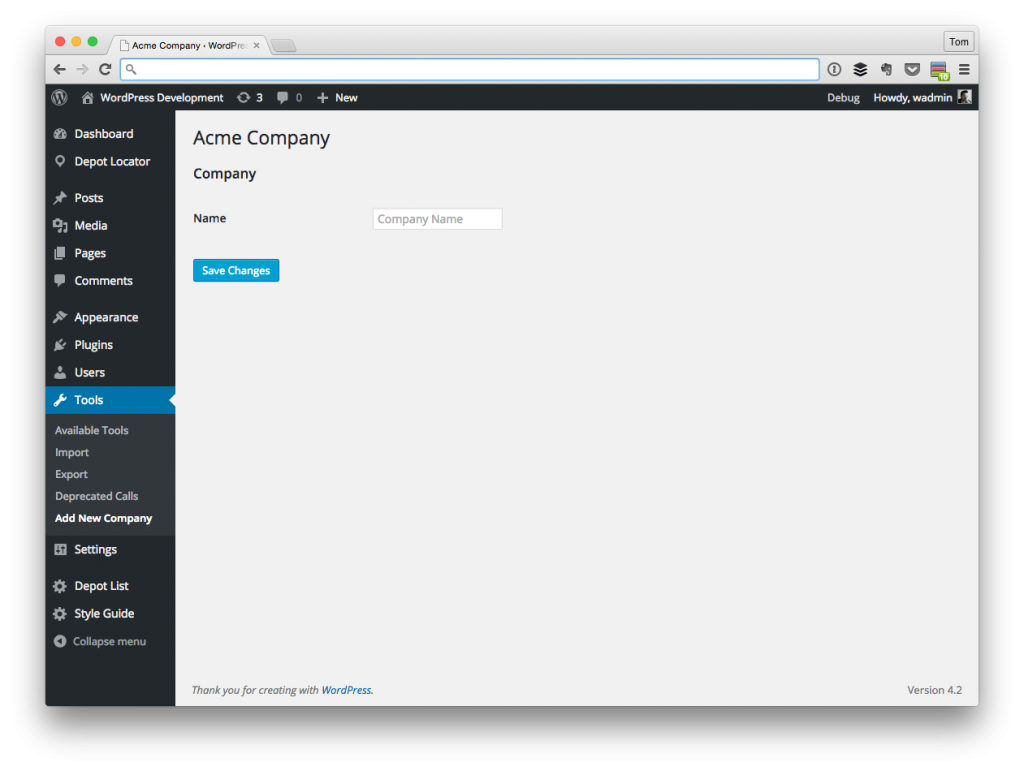
Once done, the work we have so far should appear under the Tools menu and should look like the following screenshot:
But there’s obviously something missing: We aren’t saving our options.
Saving Options, File Organization, and More
Before we go any further, we need to take a look at how our setting is going to be saved and retrieved from the database.
It’s also a good time to clean up some of the code that we have so that it has a cleaner directory that mirror more-or-less what PHP namespaces would look like.
Before writing any more code, we’re going to stop here and then take a look at how to do that in the next post.

Leave a Reply
You must be logged in to post a comment.