The title of this post is somewhat misleading as I’m not actually sharing how to programmatically populate a WordPress template – instead, I’m walking through the process of populating a page that also has a page template applied to it.
Anyway, creating WordPress templates is easy business:
- Create the template file in the theme directory
- Give the template file the proper header comments
- Fill out the template with the proper markup
Back in March, I shared a proof-of-concept plugin for including a template file in a plugin. If you browse through the comments, note that there’s a lot of discussion on how to do it, why one way is better than the others, and so on.
But as I’ve continued to work on a project in which I include templates in plugins, I’ve also been working on populating template-based pages with content from HTML files.
Here’s how I’ve been working to programmatically populate a WordPress template.
Programmatically Populate a WordPress Template
The strategy behind this process is simple: I want to give end-users who are good with front-end development an easy way to provide content to prefill a template.
Specifically, I’m bundling HTML files with the plugin that users can edit that will be used to then prefill the content of the template-based pages upon plugin activation.
Here’s how it works.
1. Add The HTML Files
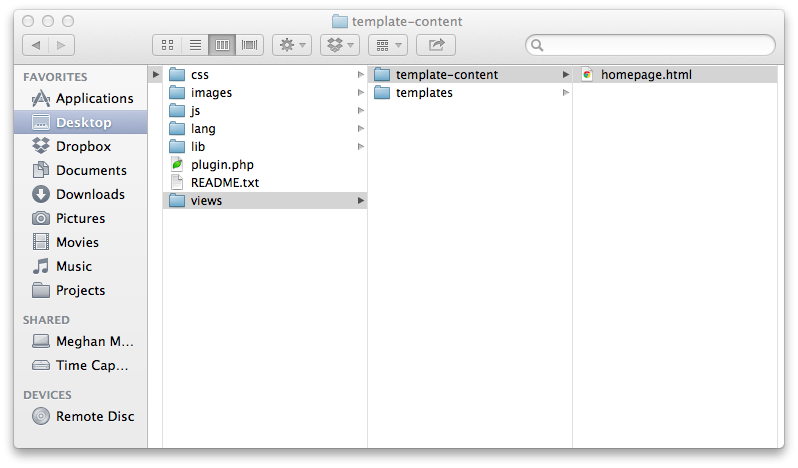
In the plugin directory, I include a views directory that also includes a template-content directory. I then create an HTML file that corresponds to its template name.
This convention is namely to make it clear what this content will populate when the plugin is activated:

In the screenshot above, you see an HTML file named homepage.html that will be used to populate the page that’s given the homepage template upon plugin activation.
2. Parse the Content
This particular step is somewhat subjective as implementations will vary; however, in my case, I’m primarily interested in setting the page’s title and the page’s content based on the content in the HTML file.
To do this, I provide two elements in the markup:
- title
- body
And then use a regular expression to parse the content.
So, for example, the markup would look something like this:
<title>This is the Page's Title</title>
<body>This is the content that's used in this page. This sentence is <strong>bolded</strong>, and <em>emphasized</em> for demo purposes.</body>
Then the function responsible for parsing this content would include two regular expressions: One for match the title and one for matching the content:
// Read the response from the template URL
$response = wp_remote_get( plugins_url( 'demo-plugin/views/template-content/homepage.html' );
$response = $response['body'];

// Parse out the titlte
preg_match_all("/\<title\>(.*?)\<\/title\>/", $response, $matches );
$title = $matches[1][0];

// Parse out the content
preg_match_all("/<body[^>]*>(.*?)<\/body>/is", $response, $matches );
$content = $matches[1][0];
Several things to note from the code above:
- I’m using
wp_remote_getas my function for retrieving the content file. This is the preferred method for retrieving content (thoughfile_get_contentsorcurlmay work, if they’re enabled on your server). wp_remote_getreturns an array, so I’m reading thebodyof said array as this contains the data in the file- I’m using two regular expressions that should be easy enough to follow. Note that I’m using the zero-th index of the first index of the returned multi-dimensional array. This ensures that we’re reading only the content of the markup. Other indexes of the array will return the full content – including, for example, the
bodytag – of the file.
After that, it’s a simple matter of programmatically creating the post.
3. Create The Post
This particular step is very similar to programmatically creating a page in WordPress except we’ll be using a different post type and we’ll be setting the page’s meta data to also include the template.
Assuming that you have the author_id and slug already defined, this is how you can programmatically create the post:
$page_id = wp_insert_post(
	array(
		'comment_status'	=>	'closed',
		'ping_status'		  =>	'closed',
		'post_author'		  =>	$author_id,
		'post_name'			  =>	$slug,
		'post_title'		  =>	$title,
		'post_status'		  =>	$post_status,
		'post_type'			  =>	$post_type,
		'post_content'		=>	$content
	)
);
After that, we need to set the post meta data so that the proper template is applied. In our case, this will be the homepage.php template that’s included with the plugin.
update_post_meta( $page_id, '_wp_page_template', 'template-homepage.php' );
And that should take care of everything.
Depending on where you implement this code, this can happen upon plugin activation, when a user opts to trigger this behavior, or at some other entry point or event in the WordPress page lifecycle.
Finally, this may look a little contrived – after all, why not just provide a title when creating the page, right? In the method provided above, you could easily substitute, say, the title with some information to that’s used to populate post meta data for the given post.


Leave a Reply
You must be logged in to post a comment.