In this post, I’ll wrap up what I began to share yesterday: Using the tools and libraries I’ve shared in conjunction with Composer to sniff your commits during development before the code hits the repository.
Ideally, you’re always going to want to see something like this in your terminal whenever you commit your code:
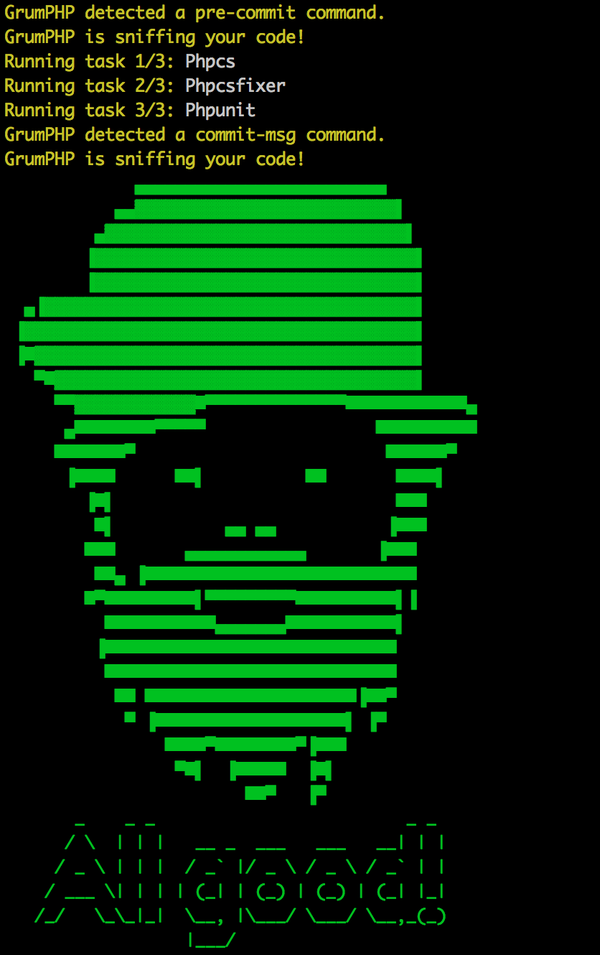
But that’s not always the case. As with most things, though, the more you practice, the more you’ll get used to writing code that will automatically pass the various sniffs put in place through the different rules (and their customizations).
Before doing that, though, you’ve got to get GrumPHP configured in your repository.
Composer for WordPress: Sniffing Commits
Yesterday, I provided a sample composer.json so today we’ll look at a sample GrumPHP configuration file and look at what each part does.
The important thing to note is that although some of what you’ll see is not atypical for a project, you can fine tune this as much as you’d like for each project you use. Sometimes you may want it to be more focused than it is now; other times, you may not care about some of the sniffs that it offers.
An Initial Configuration
That said, after GrumPHP is installed, it will create an almost empty grumphp.yml file that’s ready to be configured. For example, this is what you should see:
Notice there’s nothing to it other than specifying:
- the location of the repository,
- the location of the binaries installed via Composer,
- the tasks to run.
Note that I’ve always used ‘.’ for the location of my repository because I’ve never not installed it within the repository that I’m working.
The same goes for the Composer binaries. That is, after I install everything via Composer, I leave them in their initial locations.
And finally, the initial tasks directive is empty because there’s nothing actually to run yet. That’s what I’ll be looking at in the next step.
Configuring GrumPHP
Once you’ve got your libraries installed and are ready to setup a bit of configuration, then perhaps you can do something like this:
I won’t outline everything above (because there’s not much to outline) but there are still a few things to point out:
- Note that there is a far longer list of tasks than what was defined in the initial directory. That’s normal, and it means that we want to run those tools using the default configuration for each of those tools.
- A few of the rules have a
~beside them. This depends on the task in question, but this usually means that we want to use the default configuration. - There are tasks such as
phpparserthat have subtasks. Some of them, as you can see above, use default behavior. Others opt to blacklist terms such asdie,var_dump,exit, and more. This means, as if the directive wasn’t clear enough, we’ll cause GrumPHP to fail if any of these statements are detected. - Similarly, take a look at
phpmd. This points to the set of rules that we’ll use when looking for various messes in the code. In this case, it points to adistfile but may point to any custom set of rules that you’ve defined.
This is just a sample of what you can do with GrumPHP. That is, you can install some libraries via Composer, install them, and then tailor GrumPHP so that you’re taking advantage of the functionality it’s provided.
As with other similar projects, I highly recommend reading the documentation that exists for the various tasks that integrate with GrumPHP.
This is Composer for WordPress?
Yes and no. Composer is a general purpose package manager for PHP projects; however, we don’t seem to see it much in the world of WordPress. This isn’t to say it isn’t used (it is), but simply being aware of Composer and how to use it isn’t enough.
Instead, I think it’s important to know how to use Composer for WordPress so that we’re able to write the highest-level of quality code possible all the while making sure we’re adhering to whatever coding standards we’ve also opted to employ.