Last week, I gave my presentation at WordCamp Atlanta on Namespaces and Autoloading. (the full title was Namespaces, Autoloading, and Improving Plugin Architecture but that’s a mouthful, isn’t it?)
Because of the nature of the talk, I’ve opted to write a post to accompany the post, share the slides, and share an example plugin GitHub to help support the talk.
So if you were in attendance, thank you(!) and here’s the post, I promised. And for those of you who didn’t attend, I hope this post still helps to demonstrate the concepts and topics I discussed at WordCamp.
Namespaces and Autoloading
Before talking about namespaces and autoloading in WordPress, the reason I want to talk about this is because it can directly impact the quality of your code and it can do so for months and years to come.
After all, don’t many of us developers already ask the question:
How can we make our code better than it already is?
And many of us are smart enough to know what we don’t know. So we’re faced with working within the constraints we’re given.
Sometimes we have time to investigate ways to do this; other times, we have work with the knowledge that we have. And there’s nothing wrong with that.
But because we know what we don’t know, we know there’s potential for more.
First, Your Code
When it comes to talking about topics like namespaces and autoloading in the context of WordPress, I think we’re often met with mixed responses.
After all, we could be talking about things like The Theme Customizer or the REST API or something more fun.
I mean, “namespaces and autoloading” just does not sound exciting or forward-moving when it compares to the newer features and technologies that are available, right?
But no, they aren’t really boring. And through this post and the accompanying presentation and source code, I’m going to show you why and how they aren’t.
They Aren’t Boring
I think it’s fair to say that developers – at least a portion of us or a portion of them depending on how you see yourself – are notorious for arguing about aspects of programming.

“Boring conversation anyway.”
So if we care that much about something so small, surely we care about the larger picture. Things such as:
- Improved code
- Better organization
- Increased maintainability
- Easier debugging
- Making more money (well, maybe).
And namespaces and autoloading can lead directly to all of the above (well, I can’t speak about money, but it does have potential).
If I were to summarize the role namespaces and autoloading place in all of the above, I’d say that:
Namespaces and autoloading lead to improved code through better organization, compartmentalization or modularization, and tighter relationship through their concepts.
Further, this increases maintainability because code is organized into packages which can lead to easier debugging as the product grows.
All of this can lead to saving time or a better use of time, which depending on your business model, can impact your bottom line.
But this still doesn’t describe either of these things. But surely, at this point, they sound more interesting than when they were first introduced.
So, What They Are?
Before getting into the definitions of each and the roles they play, let’s take a look at how the lack of namespaces and autoloading in WordPress has negatively impacted your experience when using themes, plugins, add-ons, or whatever else you have.
So let’s back up for a moment and look at each of the individually.
Namespaces
Imagine that you’ve inherited a project and you’re about to begin work on it. Say it’s a WordPress plugin.
You install it; you go to activate it and then you’re given at least one of these:
- Perhaps you see that nasty organize message at the top of the browser window displaying a stack trace.
- Maybe you see a message talking about some conflict with another existing package.
- Or perhaps when you try to activate a plugin, the page refreshes but the plugin doesn’t activate.
- Maybe you’ve even done a code audit, and you see class_exists checks all throughout the codebase.
Any or all of the above can contribute to problems, of course, with WordPress projects. But namespaces can truly fix a lot of this most of the time.
That is the say, the reason you’re experiencing these problems is that the code with which you’re working is all part of the global namespace (versus its namespace) and PHP does not like when there are classes and modules named the same thing.
But when you namespace something, you give it its area relative to itself that will still play nicely with other components even if they have the same class name.
Autoloaders
As far as autoloaders are concerned, they are a bit less complicated in some ways. First, think about the code you write or the code with which you work – especially within the context of WordPress plugins – and then think about how many times you write or see the following:
And sometimes you see them at the top of the file that starts the plugin, and sometimes you see them scattered throughout the codebase.
If they are all contained within a single file, that’s not as bad because at least you know where they are. But if they are littered all over the place, then you have no idea where a dependency is being brought into the system.
Autoloading can resolve all of this by loading the dependencies when needed (and for those who are interested, autoloading is faster than manual inclusion).
Namespaces
With all of that said, we’re ready to talk about both namespaces and autoloading. But namespaces are the foundational concept, so we’ll start there.
But after all of the above, you can see the advantages of using them. Perhaps they’re even fun, right? Maybe?
Regardless, we need a definition off of which we can work when talking through this for the rest of the article.
The PHP manual provides the following definition:
Namespaces are designed to solve two problems that authors of libraries and applications encounter when creating re-usable code elements such as classes or functions…
And that’s not bad, but it’s pretty long, technical, and it might be a bit much for those who are just getting started. So let’s simplify it a little bit for this article:
A bit better, perhaps?
A way to group related classes and interfaces having a similar purpose.
I’m not going to be talking about interfaces in this talk; however, I know there are intermediate-level object-oriented developers who use them, so I wanted to make sure that I at least mention them.
A Practical Example
I don’t like programming examples that don’t give real-world or practical applications. Often, we’re given examples for things we’d never codify.
How many times have you read an object-oriented article and it gives an example of an animal class or a car class? We’re not going to be programming a car.
We’re much more likely to be working with files. So we’re going to be taking a look at a set of classes responsible for reading and writing files. That is to say, we’ve been good object-oriented programmers and separated our classes based on the responsibilities they maintain.
And yes, you may have interfaces; however, they are beyond the scope of this article, so they won’t be included.
So for our FileReader, perhaps the basics of the class look like this:
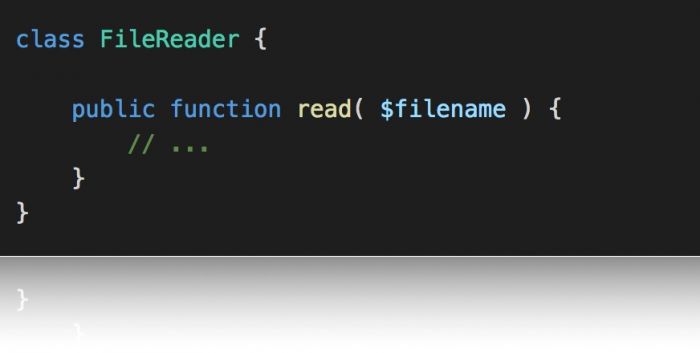
A class for reading files.
Notice that the function accepts the name of the file that it should open to read. The error checking, how it reads the file, and what it returns is all left up to the implementation of the class.
And for the FileWriter, we have something like this:
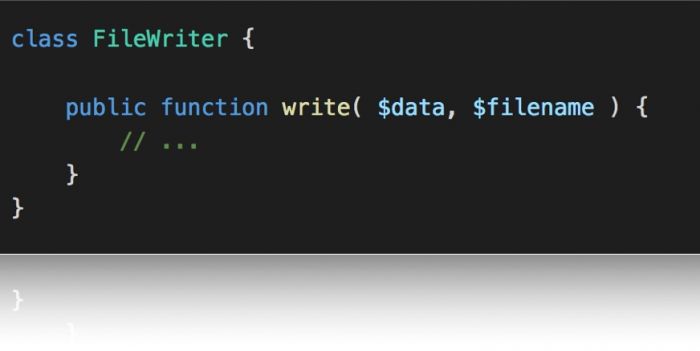
A class for writing files.
This class, on the other hand, accepts the information it’s going to write to disk and the name of the file to which it should be written.
Again, like with the example above, it doesn’t include error checking, writing the via a resource, closing the resources, and so on.
But this isn’t about working with files. Instead, it’s about showing how to namespace your code, and these two examples are meant to be foundational for that.
Notes on Namespaces
There’s a caveat to what you see in the images of the sample code above: These classes are not namespaced. That is to say, they are residing in the global namespace which leaves them ripe for conflicts with other classes.
Look at it this way: Imagine you package this code into a plugin for someone else, and then they load another plugin that also has as a FileReader or a FileWriter. Since it’s all going to be part of the same global namespace, then you’re going to be faced with a conflict.
Remember:
Namespaces are a way to group related classes and interfaces having a similar purpose.
So let’s take the classes and namespace the code.
First, we’ll provide a top-level namespace under which these classes and all other classes will reside; then we’ll provide a subpackage (or sub-namespace or subspace as I’ve heard them called) into which these file classes will reside.
This means our FileReader will now look like this:
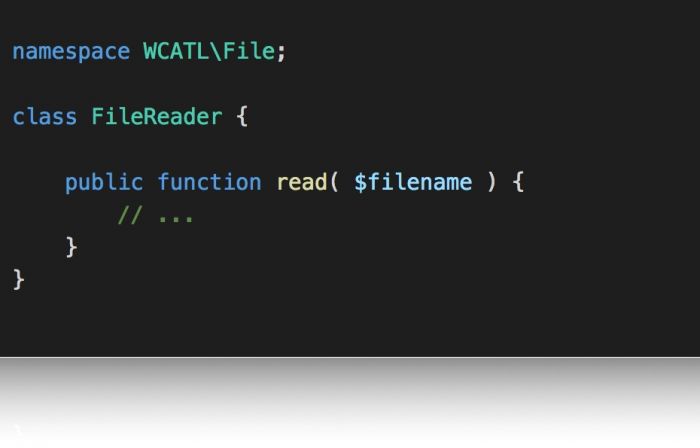
A namespaced class for reading files.
And our FileWriter will now look like this:

A namespaced class for writing files.
First, you can see that using namespaces is easy: You simply use the namespace keyword and then declare the namespace (which could just as easily be WCATL) at the top with the subpackages following.
But this does lead to other topics – namely around file organization, instantiation, and autoloading – all of which are worth covering.
On File Organization
At this point, it’s important to have a word on file organization. Depending on who you talk to, you’re going to find that some developers – surprise, surprise – have an opinion on how files should be organized (and I’m no different).
On the one hand, you don’t have to organize your files at all. In fact, you can drop every single thing into the root directory of your project, namespace the information, and be ready to go.
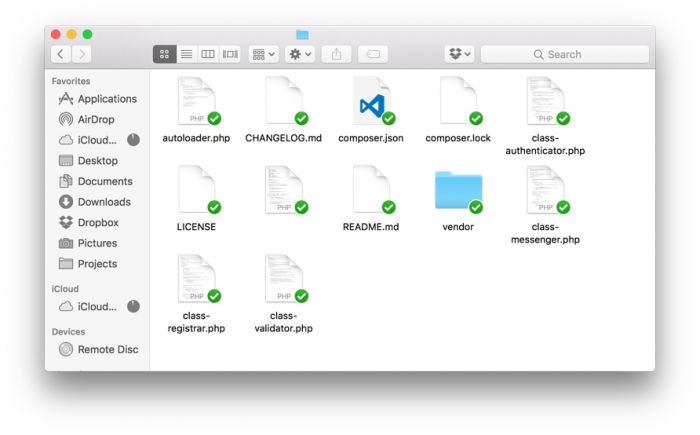
Unorganized Files
The above set of files is for a small project, so you can imagine just how many files would exist for a large project.
But when you have your files organized like this, it can make writing an autoloader a bit difficult because an autoloader needs to know where to find the files based on their namespace.
This is where the terms “logical organization” and “virtual organization” come into play.
- Logical Organization refers to how the files are organized on disk, like what you see above. They are logically located in the root directory.
- Virtual Organization refers to how the files are organized regarding their namespaces. That means there are directories and subdirectories that map to the namespaces, subpackages, and so on.
So if you were to take the above project, its namespaces, its subpackages, and then organize them both logically and virtually, it would look something like this:
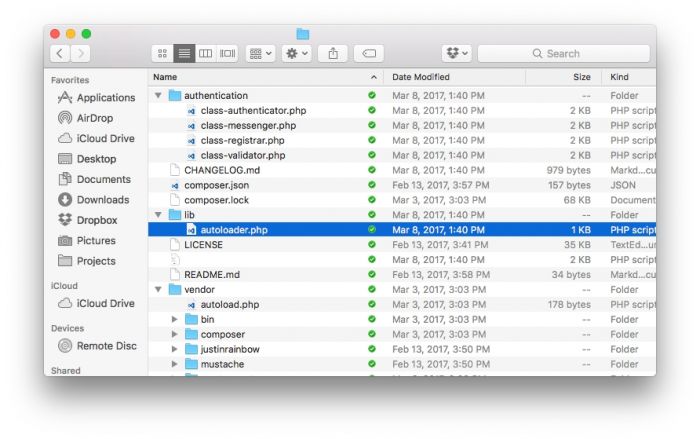
Namespaces and Autoloading: Organized Files
And though you can opt to organize your files however you like, I’m a fan of making sure there is parity between the two. That is, I like my logical and my virtual organization to match like you see in the image above.
As I move into discussing autoloading, you’ll see why this matters.
Notes on Namespaces
What happens, though, when we need to instantiate classes that are namespaced? When classes aren’t namespaced, it’s easy to use the ‘new’ keyword.

Instantiation without a namespace.
But we have to instantiate a namespaced class, we have to take it a step further and use the fully-qualified name:

Namespaces and Autoloading: Instantiation with a namespace.
But this gets cumbersome, doesn’t it? This particular example isn’t so bad, but imagine if you were working on something with more subpackages. It would get pretty cumbersome, wouldn’t it?
To that end, we can use what’s called aliasing. It’s simple, too. We can define use the ‘use’ keyword at the top of the file to refer to the namespace we want to alias and then use the last subpackage as part of the alias to instantiate our class.
Sounds confusing, doesn’t it? Perhaps see it in action will help:
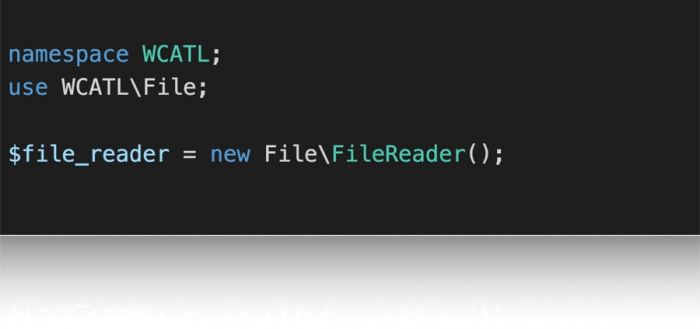
Aliasing namespaces.
And that’s all there is to it. Yes, you can take aliasing a step further, but this is as far as I’m taking it in the context of this article.
Autoloading
At this point, we have the foundation laid for autoloading. Yes, working through namespaces can be a lot of work if you’re not used to it; however, it’s important to understand because autoloading requires a bit of work that might be unexpected if you’ve never been introduced to it before.
Regardless, the most important things to remember regarding namespaces, at this point, are:
- Namespaces are a way to group related classes and interfaces having a similar purpose.
- Create parity through your files and namespaces my making sure your logical and virtual organization are the same.
And now it’s time actually to look at autoloading.
Notes on Autoloading
First, let’s look at the definition of autoloading as provided by the PHP manual:
The spl_autoload_register() function registers any number of autoloaders, enabling for classes and interfaces to be automatically loaded if they are currently not defined. By registering autoloaders, PHP is given a last chance to load the class or interface before it fails with an error.
It’s not bad. It’s lengthy, though. So just as we did with namespaces, let’s use a shorter definition for this article:
A way to automatically load interfaces and classes without using include and require statements.
Again, we won’t be using interfaces in this article though some developers do. And that will provide the working definition for the remainder of this article.
A Practical Example
Once you have your files organized, namespaced, and ready to load, then it’s time to do just that, right? I mean:
- your files are organized,
- you’re ready to load them
So it’s time to do it automatically, right? But there’s a catch. The whole “automatically loading” files requires a little bit of work.
Writing An Autoloader
That is, it is automatic, but it still requires a little more work on our part. Before getting into those steps, it’s important to note:
- it’s not fully automated,
- we have to write it.
As nice as it would be to have the code automatically loaded, we have to read some data, parse it, and then try to load the proper file.
But assuming you write it properly and your namespace and organize your files in the same manner for each project, you can reuse your autoloader. That is, you write it once, and you can use it in other projects.
Steps For An Autoloader
When writing an autoloader, there are just a few steps to follow. The autoloader has to be able to answer the following files:
- Where are the files?
- How are they named?
- Does the file exist?
If all of the above are true (or you can answer “yes” to all of them), then the autoloader will do what it’s supposed to do.
We’ll take a look at some code in a moment, but the first thing to note is that this uses a function called spl_autoload_register.
SPL refers to the Standard PHP Library, and the function accepts a function as an argument, and that function accepts the name of the class that’s going to be instantiated. It’s more procedural than object-oriented, and I’ll talk about this momentarily, but it’s important to keep in mind as you read this code.
Here’s the first part of the code. I’ll explain what it’s doing after the fact:
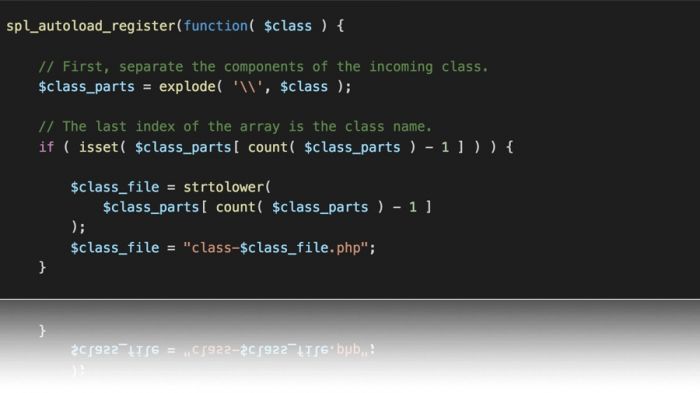
Autoloading, Part 1 – Finding the Class
In this part of the code, the function receives the fully-qualified name of the class to be instantiated (such as “WCATL\File\FileReader()”).
Next, it separates all parts of the fully-qualified name into parts. The name of the class is the last index of the array, and I opt to name my files as “class-filereader.php” so the function creates a variable, $class_file, that refers to the name of the file.
But we’re not done yet. We still have to get the fully qualified name (that is, where the file is located on disk). This might look something like this:
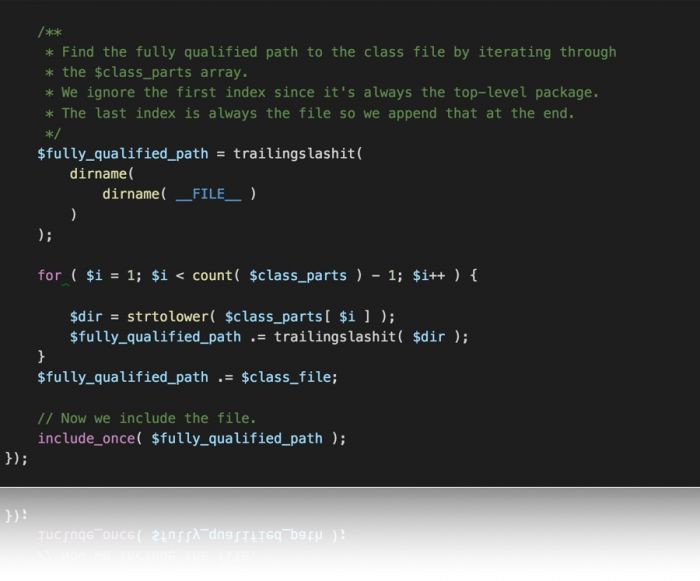
Autoloading, Part 2 – Getting the Fully-Qualified Name
At this point, we prepare a variable, $fully_qualified_path, that will refer to the top-level directory.
Next, the code iterates through all indexes of the array and creates a path fo the class file. You can imagine this as building a string such as “wcatl\file” that we then combine with the $class_file.
This means the fully-qualified path to the file becomes “wcatl\file\class-filereader.php.”
And finally, we include the file. Note that this code is not checking to see if the file exists. Though I recommend it, it’s been left out for the sake of length and because, in our example, we know the file does exist.
If the file does not exist, there are several options:
- Throw an exception,
- Catch an exception,
- Display an error message of your own,
- Or some other option that I may be considering in this article.
Regardless, the idea is to be defensive in your code so you can prepare for the case that a file doesn’t exist and you can gracefully handle the failure.
On Autoloading
Before concluding, it’s import to note the following:
- Throughout the example, we’ve been using object-oriented code when namespacing the code. After all, it’s an object-oriented concept.
- Our autoloader is written in procedural code. What gives?
Ultimately, this has to do with the Standard PHP Library. You can write an object-oriented autoloader, but I think it’s a little overkill in many cases.
The process of loading a file is a step-by-step process so writing it in a procedural manner is a natural fit.
Finally, others may opt to use tools such as Composer to bring in dependencies. These are great tools, and there’s a lot of advantages to using something like this; however, it’s beyond the concepts and topics in this article and is best left for a future talk.
Resources (and Thank You!)
This has been one of the longest articles I’ve written for my site.
This is partly because it’s based on a talk for a WordCamp and also because I want to make sure that I provide a solid introduction and foundation where you can begin incorporating namespaces and autoloading into your WordPress plugins.
In addition to this article, I’ve also provided the following resources:
- The slides of my presentation are available on SpeakerDeck.
- I have the code from this presentation avaialble for download on GitHub.
And with that, I hope this this provides a solid introduce to namepsaces and autoloading and that you’re able to begin incorporating this more and more into your work. It greatly benefits your work and other developers who may end up using your work, too.