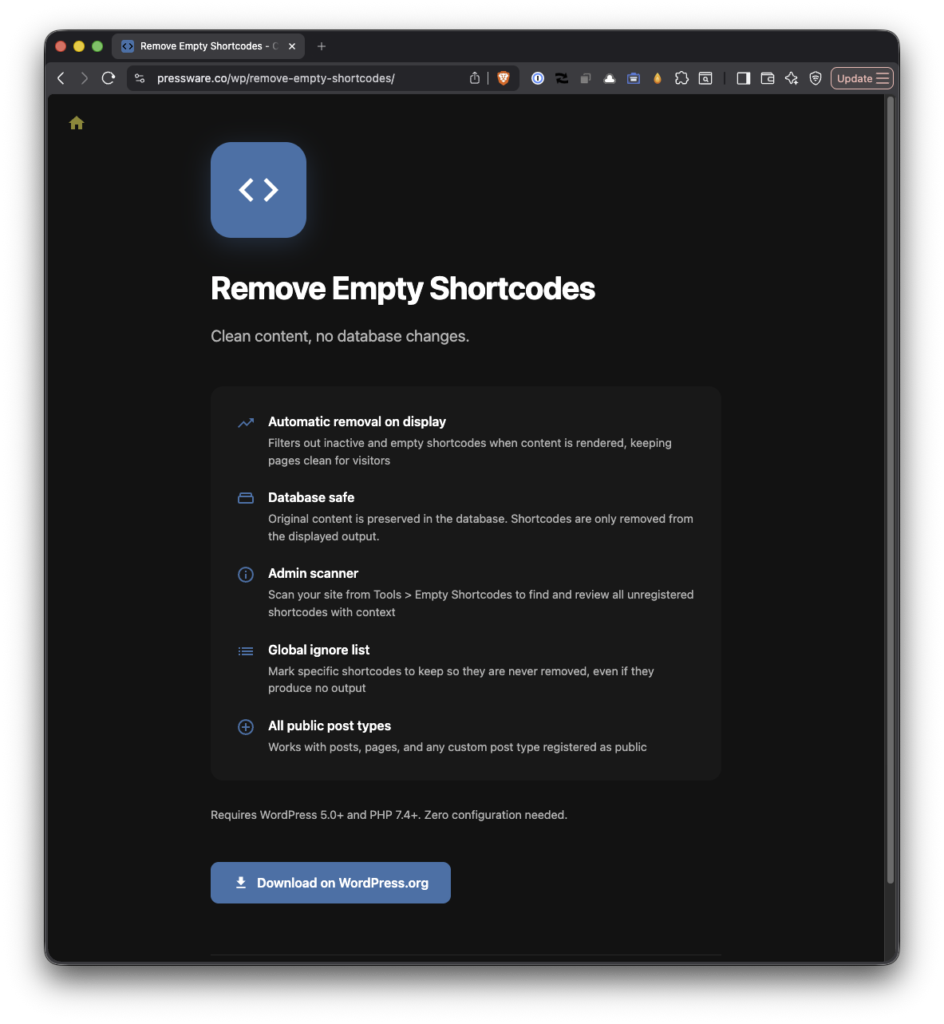
Software Engineering in WordPress, PHP, and Backend Development

Author: Tom (Page 1 of 427)

Easily Backup and Sort Apple Photos, Videos, Media, and AI Content

Like most, the majority of files (project files, photos, videos, etc.) are all backed up to the cloud each day because, you know, just in case. But I treat my photos and videos a bit different. Yes, I have daily backups, but I handle my monthly backups a little bit differently.

Roughly 20 years ago, I lost all digital photos and videos that I’d had taken since digital cameras and cell phones with cameras became mainstream. The short of it is that I had all of that data backed up on two external hard drives. One was always connected to my machine, the other was sync’d periodically, because redundancy is important, right?

But fires don’t care about redundancy.

Since then, it would be an understatement to say I’m extremely particular with my backup process especially as it relates to photos and videos. And even more so since we’ve had kids.

Anyway, the gist of my process for backing up photos and videos from Apple Photos roughly follows this process:

  1. Export all images and videos from the last month
  2. Convert all HEIC to lossless JPEG
  3. Separate HEIC, JPEG, video, screenshots, AI generated images, etc. in separate directories
  4. Name the files based on the date contained in the EXIF data (or the closest approximation from file creation or modification)
  5. Rsync this both with a local, external drive and a cloud backup service.

The most time-consuming part of the process are steps two through four. The rest are ideal for automation via local scripts and programs.

So to make the process a bit easier, I have a Monthly Backup utility I use help take care of the entire export. And maybe it’s something useful for others, too.


Backup and Sort Photos, Videos, Media, and AI Content

As the repository states:

A utility for easily backing up photos, videos, and screenshots from Apple Photos library.

When you export unmodified photos from your Apple Photo library, you place them in an export directory in the root of the project. Then, after setting up the Python virtual environment and installing the dependencies, run python -m src.main and you’ll have all of the files organized into subdirectories:

  • photos/ – actual photos with proper EXIF timestamps
  • videos/MOV, MP4, and other video files
  • screenshots/ – iOS and macOS screenshots automatically detected
  • generated/ – AI-generated images and heavily edited content
  • unknown/ – anything that doesn’t fit the other categories

They’ll also be renamed based on the EXIF or metadata timestamps for ease of organization. The format is simple: YYYY.MM.DD.HH.MM.SS, which makes chronological sorting trivial.

And if you’re curious to see how your content will be processed, you can run python -m src.main --dry-run to see what will be processed and how it will be organized. This way, you’ll know if this is – or isn’t – the right program for you before making any changes to your files.

Installation

Three steps: clone the repository, create the virtual environment, install the dependencies.

Or, in other words:

# Clone the repository
git clone https://github.com/tommcfarlin/tm-monthly-backup.git
cd tm-monthly-backup

# Create the virtual environment.
python3 -m venv tm-backup-env
source tm-backup-env/bin/activate

# Install the dependencies.
pip install -r requirements.txt

Then you can run the program. I typically use it once a month, as stated, after exporting that month’s photos and videos from iCloud, but you can run it as frequently or infrequently as you want.

More Technical Details

The remainder of this this article covers how the program actually works, how to use it, and how you can fork it, report bugs, or add features.

Sorting Types of Files

The program does more than just move files around. It actually looks at the content and makes intelligent decisions about how to handle it.

Images

For HEIC files, it converts them to high-quality JPEG while preserving all the EXIF data. Apple’s sidecar files (those .aae files that come along for the, ahem, ride) get cleaned up automatically since they aren’t needed when the conversion is done.

Videos

Video timestamps are extracted from the actual video metadata, not just the file creation date. This matters because if the file has been copied or moved, the filesystem date might be wrong, but the embedded metadata in the video file itself is usually accurate.

AI Content

The AI content detection is particularly useful (and something I didn’t really need until recently, for obvious reasons). Images from ChatGPT or other AI tools are automatically separated into the generated folder. It looks for C2PA metadata, UUID-style filenames, and other signals that something was generated rather than captured with a camera.

Screenshot detection works by recognizing iOS and macOS patterns. Those IMG_3XXX.PNG files or anything with “Screenshot” in the name gets sorted appropriately.

When there are duplicate timestamps, which happens especially when burst mode has been used, the tool increments the seconds to keep everything unique. And if a file is missing EXIF data entirely, it falls back to filesystem timestamps and will generate a note about this in its output.

Usage

Assuming you’ve already installed the program, here’s a few notes on how to use it.

The utility expects your exported files to be in an export/ directory and will create a backup/ directory with all your organized content. If you want to see what it’ll do before committing, that dry-run flag is your friend.

For debugging or if you’re just curious about what’s happening under the hood, there’s a verbose mode: python -m src.main --verbose. It’ll show you all the processing details, which is helpful if something isn’t working quite right or if you want to understand how a particular file got categorized.

The whole thing is built with proper CLI conventions, so python -m src.main --help will give you all the options if you need a reference.

Obligatory Contribution Note

If you’re backing up Apple Photos and related media on a regular basis and find the manual organization tedious, feel free to check it out on GitHub.

The code is MIT licensed, so you can use it, modify it, or ignore parts you don’t need. And if you find issues or have suggestions, pull requests are always welcome.

How To Use Roots Radicle with Laravel Herd

I’ve previously written about using Laravel Herd as my preferred PHP development environment. Outside of my day-to-day work, I’m also working with a couple of friends on a project that includes an iOS app that talks to a REST API via headless WordPress backend.

The web app is built using a set of tools from Roots including Radicle:

Radicle is an opinionated starting point for WordPress projects with the Roots stack.

In short, Radicle allows us to use features of Laravel within WordPress. But one of the challenges with my set up is getting Laravel Herd and Radicle to actually work.

Turns out, the solution isn’t that hard. And if you’re in a similar situation, here’s how to work with Radicle with Laravel Herd.


Roots Radicle with Laravel Herd

Project Set Up

First, I’m operating on the assumption that you have your project is already linked and secured with Herd.

In our case, we’re using a monorepo that contains both the iOS app and the web application. The web app in question is located in projects/monorepo-name/apps/wordpress. So I’ve issued the usual commands add that directly to Herd.

Secondly, I’ve got the .env file configured so that it has all of the necessary information for the database, various WP environmental variables, salts, and other information required to stand up the web app.

The Actual Problem

Third, and this was the most problematic, I had to add a custom driver that would allow Radicle to work with Laravel Herd. The path to custom drivers on your machine may vary but if you’re running the latest version of macOS and haven’t customized the Herd installation then it should look something like this:

/Users/yourname/Library/Application Support/Herd/config/valet/Drivers

Note that if the Drivers directory doesn’t exist, create it. Then touch a file named RadicleValetDriver.php in that directory and add the the following code (you shouldn’t need to change any of it):

<?php

namespace Valet\Drivers\Custom;

use Valet\Drivers\BasicValetDriver;

class RadicleValetDriver extends BasicValetDriver
{
    /**
     * Determine if the driver serves the request.
     */
    public function serves(string $sitePath, string $siteName, string $uri): bool
    {
        return file_exists($sitePath.'/public/content/mu-plugins/bedrock-autoloader.php') &&
               file_exists($sitePath.'/public/wp-config.php') &&
               file_exists($sitePath.'/bedrock/application.php');
    }

    /**
     * Determine if the incoming request is for a static file.
     *
     * @return string|false
     */
    public function isStaticFile(string $sitePath, string $siteName, string $uri)/* : string|false */
    {
        $staticFilePath = $sitePath.'/public'.$uri;
        if ($this->isActualFile($staticFilePath)) {
            return $staticFilePath;
        }

        return false;
    }

    /**
     * Get the fully resolved path to the application's front controller.
     */
    public function frontControllerPath(string $sitePath, string $siteName, string $uri): string
    {
        $_SERVER['PHP_SELF'] = $uri;
        if (strpos($uri, '/wp/') === 0) {
            return is_dir($sitePath.'/public'.$uri)
                            ? $sitePath.'/public'.$this->forceTrailingSlash($uri).'/index.php'
                            : $sitePath.'/public'.$uri;
        }

        return $sitePath.'/public/index.php';
    }

    /**
     * Redirect to uri with trailing slash.
     *
     * @return string
     */
    private function forceTrailingSlash(string $uri)
    {
        if (substr($uri, -1 * strlen('/wp/wp-admin')) == '/wp/wp-admin') {
            header('Location: '.$uri.'/');
            exit;
        }

        return $uri;
    }
}

Note this is running on PHP 8.4 so you may need to adjust your function signatures and other features if you’re running on a significantly lower version (though I didn’t really test thing on anything lower than 8).

Once done, you should be able to load your project in the web browser. If not, restarting Herd’s services should do the trick. And, on the off change you still have an error, the stack trace should be easy enough to follow to see where the problem lies.

Given a vanilla Herd set up and Radicle integration with your WordPress project, this custom driver should be all you need to get everything working with as little effort as possible.

Note: This was adapted directly from the Laravel source code which you can find on GitHub.

Keep Looking For Titles on Where Can I Watch? It’s Updated.

A month ago, I launched and shared Where Can I Watch?

The original version of Where Can I Watch?

When I first shared this online, I described both its impetus and purpose like this:

A few months ago, one of my kids was asking where should could watch a specific show.

Coincidentally, I was also looking for a small project to work on on the side so I took her question, where can I watch whatever-the-show-is, and turned it into a simple app.

If you read the initial post, you know I described it as:

A mobile application that makes it easy to find where to watch a show or movie.

The thing is, it’s not a mobile application. Instead, it’s a web app that runs in the browser so it’s available on as many devices as platforms as possible. But over the past few weeks, I’ve been working on seeing how feasible it would be to begin converting it to an actual mobile application.

Before moving full into the Apple economy, purchasing the developer license (of which I’m still unsure is something I want to do), and trying to port the web app into an iOS app, I’ve been refining the web app to follow standards that more closely align with mobile user interface and user experience patterns.

So, four weeks later, I’ve another version of Where Can I Watch that’s available here.


Where Can I Watch: New Features, Improvements, and Reductions

At first glance, it’s obvious the UI has been overhauled:

The current version of Where Can I Watch?

If you’re interested in using the app to find where you can watch any given show or movie, then go ahead and visit the site. If you’re interested in more of the technical details of this version, read on.

But there’s been a lot of stuff I’ve done on both the frontend and the backend of the app to both add features, improve performance, and bring greater parity to what we’re used to seeing within actual mobile apps.

New Features

The most significant change is a complete visual and interactive overhaul to match native iOS patterns. This includes everything from the typography and color standards, as well as the grid system. I’ve also added the spring physics animations we’re used to seeing in our mobile apps.

The dark mode and light mode toggles have been removed in favor of the full dark mode. This is something that could eventually be restored especially when the mobile app is done (if it’s ever done), but I’m partial to this aesthetic so I’ve stuck with it.

Each show and movie also includes a link to the IMDB page for the title in case you’re interested in a synopsis, run time, trailer, and all of the other stuff that is outside the scope of the app.

Finally, I separated out the services where a title can be streamed versus where it can be bought or rented.

Improved Performance

The search functionality was overhauled (which was triggered when I saw how long it took to load a franchise – for example, searching for superman or batman brings back a high number of titles which was taking far longer than it should). The new implementation handles searching in a way that’s more performant and that’s easier to making API requests to conserve data when doing so over a cellular connection.

Where possible, I implemented GPU acceleration animations for better performance and reduced motion affects for accessibility. Further, I tried to add aria labels across components to play well with accessibility.

Finally, I introduced a caching mechanism using Redis on Vercel so that if someone searches a title and then another person searches the same title within a reasonable time window, those results can be pulled from the cache without having to initiate yet-another-API-call.

For those interested, the changes to the API ultimately resulted in the following:

  • Before: Individual API calls per result (100+ requests for large searches)
  • After: Batched requests with chunking (2-3 requests maximum)
  • Impact: 95% reduction in API calls, dramatically faster loading

What Was Removed

In addition to removing light mode, I also stripped out all of the emojis as I’m not a big a fan of them. Further, they aren’t part of typical mobile app design language nor are they part of the iOS human interface guidelines.

For those that caught an intermediary version of the app from last month, I’d introduced a feature where if a title wasn’t playing in the United States or wasn’t available for streaming, I’d add it to a ‘Not Streaming’ tab; however, this tab negatively impacted the UI so I’ve hidden that functionality for now.

Further, adding international support for titles is also something that I’d eventually like to incorporate. First, though, I’d like to get a stronger foundation of the service completed.

Conclusion

Though the app is still built using Next.js and running on Vercel, I’m currently working on trying to build a shared backend and create one front-end for the web that maintains what’s available today and another front-end using React Native that will allow for an iOS version of the app.

As I’ve done with the last two posts, I’ll continue to document the progress.

That said, I appreciate the notes for those who’ve used this incredibly simple app so far. It’s always fun to hear that it’s something useful for someone else. And for as basic as it is, it’s been a lot of fun and to put it together and to stretch into areas that I don’t normally work

Easily Find Where Your Shows and Movies Are Streaming With Where Can I Watch?

For I don’t know how long, I’ve used Television Time to track the shows I watch (or have watched) because it’s easy. It’s one of those apps that’s helpful but also aims to primarily do one thing and do it well (something I was also writing about 12 years ago).

Obviously, I’m a fan of those types of projects.

A few months ago, one of my kids was asking where should could watch a specific show. A fair question given the amount of streaming services available and since shows and movies are available on one, a couple, some, or all, and are available for rent and/or purchase depending on one, some, or all of those services.

Coincidentally, I was also looking for a small project to work on on the side so I took her question, where can I watch whatever-the-show-is, and started working on an iOS app using React Native. And while I was working on it, I thought I’d go ahead and make sure it’d work on Android, too.

But that was a false start.


Where Can I Watch?

Suffice it to say, the cost of an Apple Developer License and the need to have as much parity as possible between iOS and Android especially when you’re trying to maintain the same design language as well as the various dependencies required to get the emulators set up locally quickly exceeded what I consider to be territory for a side project. Given all of that, I went back to the most ubiquitous platform we have: The web.

Even still, the goal of Where Can I Watch? was simple:

A mobile application that makes it easy to find where to watch a show or movie.

And I started working on the project again. And now here’s Where Can I Watch? It’s a simple app that returns results for exactly where you can watch a given show or movie:

And that’s it: Nothing to download, no accounts, no social aspects, no links, nothing else. Enter a title you want to watch and then see where you can find it.

You can add this bookmark to your browser or to the home screen of your iPhone, iPad, or Android, obviously.

Finally, this is one of those projects that lends itself to constant tinkering so, as time and desire allow, I’ll make changes. As I do, I’ll talk about them here and potentially add a small page on the site that tracks what was rolled out and when.

Tech Stack

And for those of you who are interested, here’s a high-level explanation for what was used to build this:

You can view all of the source code for the project on GitHub. There’s a single doc that outlines some of the technical details of the project, too.

Use WP Bulk Plugin Updater to Automate WordPress Plugin Updates

For the last year or so, I’ve spent the majority of my time working on technologies adjacent to what I’ve historically done (case in point), but that doesn’t mean there aren’t times where I’m not still working directly with WordPress.

Recently, I’ve needed to manage a set of servers and sites that needed a round of updates. One of the most common set of updates needed to be performed was updating plugins with known CVEs. The process by which I like to do this is:

  1. Verify the site as a repository set up to manage the code (and set it up, if not).
  2. Also verify the repository has wired up to a CI/CD tool so branches, tags, and so on can be deployed across staging, beta, or production environments (and set it up, if not).

Then, the workflow I usually use is, at a high-level, like this:

  1. Create a develop branch off of master
  2. For each plugin update, create a new update/ branch (named something like update/plugin-slug
  3. Perform the actual update
  4. Then commit that branch to the repository.

Regardless of how many plugins you’re dealing with, this strategy allows you to update plugins independently of one another, perform a revert when necessary, cherry pick certain commits to set up a custom release, and so on.

Ultimately, it allows you to set up tags or, more generally, revisions for how you want to release your site without having to wait for every single plugin or dependency to have a problem resolved.

And it maintains good Git workflow practices.

That said, it’s tedious work. It’s boring enough if it’s, say, a dozen plugins but what if you’re maintaining a site or headless application that has twice – or even four times – that many?

You automate it. That’s why I wrote WP Bulk Plugin Updater.


WP Bulk Plugin Updater: Automate Updates

I describe WP Bulk Plugin Updater as:

A PHP tool that automates WordPress plugin updates with individual Git commits, push capabilities, and detailed logging for easy site maintenance.

The general idea behind the program is simple:

  • Find the list of all plugins that need to be updated,
  • Create a branch for each plugin that’s updated,
  • Commit each branch to the repository.

There are some caveats, though:

  • WP CLI. This must be installed. The program will verify that it is, in fact, available and will terminate early if not.
  • Git. This should be obviously, but the program is meant to be run in the root of the WordPress project’s installation (it can run in wp-content as well but I initially designed it to drop into the application’s root directory).
  • PHP 7.4. This is the minimum version of PHP required (though you’re always going to hear me pushing for 8+).

Assuming all of those are in place, then you’ve got everything you need for the program to do it’s thing.

The program will also generate two output files: One file tracks the list of plugins that were successfully updated. The other tracks what files need to be manually updated which usually comes in the case of premium plugins.

Finally, if you’re interested in running the program but not actually taking any action until you’re sure it’s going to do what you want, then you can use any of the available options:

  • --dry-run: Show what would be updated without making changes
  • --no-push: Update plugins and commit but don’t push to GitHub
  • --branch=BRANCH: Set the branch to push to (default: current branch)
  • --help: Display help information

All of this is available in the README in the repository.

Future State

The program isn’t officially tagged as I’ve been using master for the work I’ve been doing as of late. If it continues to work fine, then I’ll include a CHANGELOG, a proper ISSUE_TEMPLATE, and tag an official version.

Finally, if you use the Bulk Updater and find it useful, open any issues, feature requests, or PRs.

« Older posts

© 2025 Tom McFarlin

Theme by Anders NorenUp ↑