As a developer, one of the challenges of working with WordPress as a platform is that finding information isn’t always easy. Sure, the Codex is a fantastic resource, but it lacks in a few areas.
On the other hand, it’s relatively easy to google for examples on how to do almost anything you’d like with WordPress, but these examples can often be of poor quality – just because something works doesn’t mean that it’s done correctly.
As I begin to shift my focus to talking more about WordPress development, I hope to be able to share a few thoughts on how to achieve certain tasks using the best practices with the WordPress API.
In recent weeks, I’ve been doing a fair amount of work using the WordPress Ajax API, so that seemed like a good place to start.
Ajax is now a common technology so I’m assuming that you have a high-level understanding what Ajax is, how it works, and for what it’s used. My ultimate goal is to provide an explanation of the WordPress Ajax API and how to use it in a practical example.
Understanding the API
The WordPress Ajax API is available for developers to initiate asynchronous requests from within the WordPress dashboard or even the public-facing side of a theme (or plugin).
At the most basic level, a feature that’s Ajax-enabled includes three components:
- An element, such as a button or a checkbox, used for triggering an event like when a user performs a click
- JavaScript for handling the event (such as the click) and sending the request to WordPress and optionally handling the response
- A server-side function used to process the data
Outside of of WordPress, Ajax is relatively easy to implement and though the Ajax API provides the facilities to make this easy within WordPress, it helps to keep the three components mentioned above in mind.
Once you’ve got them down, implementing Ajax in WordPress is more like a recipe than a problem to solve. It’s a three step process that can be implementeld the same way every time.
A Practical Example

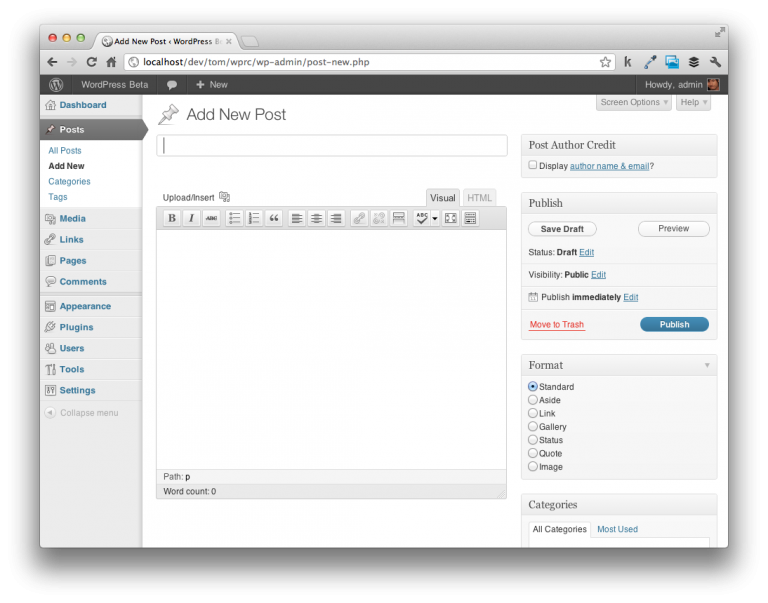
Oftentimes, seeing a working example can be more effective than talking about code at some abstract level so I’ve written a small plugin that does the following:
- Introduces a checkbox above the Publish options in the WordPress dashboard. See above screenshot.
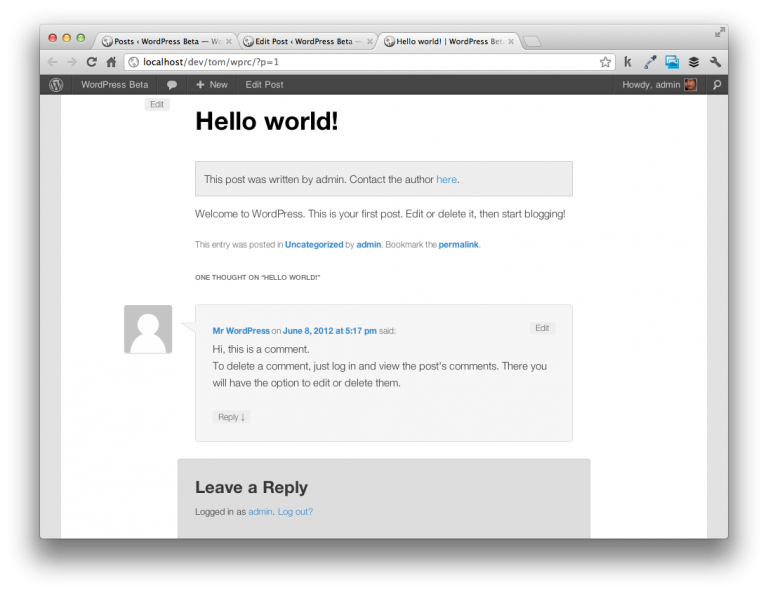
- When clicked, the author’s name and a link to contact the user will be rendered above the content on each post page.

The traditional model for doing something like this is simple:
- Introduce a custom meta box
- Save the option when the user click’s Publish
- On the public-facing side of the theme, if the option has been set then render the data
This particular example does not use Ajax and you can grab the 0.5 tag from GitHub. It includes all of the functionality above without the Ajax features. This version of the plugin lays the foundation for the Ajax work.
JavaScript Handlers
In order to implement Ajax, we basically want the same functionality above but without the user having the click on the Publish or the Update button under the Publishing options.
Earlier, we mentioned that the first thing that we need to do is write some JavaScript to respond to the event when the user clicks on an element. In our case, we’re going to respond to when the user clicks on the checkbox.
First, we need to make sure the checkbox has an ID that our JavaScript can use to access the element. Reviewing the post_author_credit_display() function, notice that it has already been provided:
<input id="post_author_credit" type="checkbox" name="post_author_credit" value="1" checked="checked" />ID, 'post_author_credit', true ), 1, false ) . ' />
Next, we need to write a small bit of JavaScript to respond to when the user clicks on this element:
(function($) {

 $(function() {

 /* TODO */

 });

})(jQuery);
We’ll revisit this JavaScript function momentarily.
After that, we need to implement a nonce value so that when we send data to the server, WordPress knows that the request that’s coming through is secure. To do this, we can add the following line to the post_author_credit_display() function.
Note use of the ‘hidden’ so that users won’t actually see the value:
'<span id="ajax_post_author_credit_nonce" class="hidden">' . wp_create_nonce( 'ajax_post_author_credit_nonce' ) . '</span>';
Server-side Functions
At this point, a function will need to be introduced into the server-side code (be it your theme or your plugin) that will be used during the course of the Ajax request. This consists of three parts:
- Introducing and registering an action specifically for the Ajax request
- Writing a function to verify the nonce and serialize the data
- Returning a request
add_action( 'wp_ajax_save_post_author_credit', array( &$this, 'ajax_save_post_author_credit' ) );
You can read more about this in the Codex article but the gist of it is that you must prefix your custom function with wp_ajax. In order words, you register your action with wp_ajax_{your-custom-function-name}.
Note that we’ve registered a function called ajax_save_post_author_credit(). This function will be responsible for verifying the nonce then updating the necessary post meta data:
function ajax_save_post_author_credit() {

	// Verify that the incoming request is coming with the security nonce

	if( wp_verify_nonce( $_REQUEST['nonce'], 'ajax_post_author_credit_nonce' ) ) {

		// Set the value of the post meta based on the post data coming via the JavaScript

		$post_author_credit = '';

		if( isset( $_POST['post_author_credit'] ) && 'true' == $_POST['post_author_credit'] ) {

			$post_author_credit = 1;

		} // end if

		// Attempt to update the post meta data. If it succeeds, send 1; otherwise, send 0.

		if( update_post_meta( $_POST['post_id'], 'post_author_credit', $post_author_credit ) ) {

			die( '1' );

		} else {

			die( '0' );

		} // end if/else

	} else {

		// Send -1 if the attempt to save via Ajax was completed invalid.

		die( '-1' );

	} // end if

 } // end ajax_save_post_author_credit
Note, however, that there are three specific pieces of information that this function is using:
- $_REQUEST
- $_POST
- $_POST
WordPress relies on the die function for sending data back to the browser based on the status of the request. I use three values to indicate whether or not the request was successful. Though this isn’t absolutely required, it’s great for debugging.
This data is actually transmitted using the JavaScript that was provided earlier in the article. To finish this up, we need to implement the JavaScript code responsible for sending this data to the server side.
Implement the Ajax Request
For the most part, this is the standard way for setting up an Ajax request in WordPress. Note that the pieces of information that are required above are provided below (along with comments):
(function($) {

	$(function() {

		// Setup a click handler to initiate the Ajax request and handle the response

		$('#post_author_credit_checkbox').click(function(evt) {

			// Use jQuery's post method to send the request to the server. The 'ajaxurl' is a URL

			// provided by WordPress' Ajax API.

			$.post(ajaxurl, {

				action:	'save_post_author_credit', // The function located in plugin.php for handling the request

				nonce: 	$('#ajax_post_author_credit_nonce').text(),// The security nonce

				post_id:			$('#post_ID').val(),						// The ID of the post with which we're working

				post_author_credit: $(this).is(':checked')						// Whether or not the checkbox is checked when clicked

			}, function(response) {

				/*

					Here, you can read the response data and handle the response however you want.

					You can add a new element to the DOM, toggle visibility of a page element, etc.

					These values correspond to the 0, 1, and -1 located in ajax_save_post_author_credit() in

					plugin.php.

					if( 0 === response) {

						// The request was successful and saving of the data succeeded.

					} else if( 1 === response ) {

						// The request was successful but saving the data failed.

					} else if( -1 === response ) {

						// The request failed the security check.

					} // end if/else

				*/

			});

		});

	});

})(jQuery);
The format for sending an Ajax request using the WordPress Ajax API is simple:
- Setup a jQuery post function that has the ajaxurl set as the URL for the request (ajaxurl is provided by the WordPress Ajax API)
- Specify an action. In our case, it’s the name of the function that we’ve defined on the server side and that we registered with WordPress without the wp_ajax prefix
- Send the nonce value which corresponds to the $_REQUEST mentioned earlier
- Send another other information necessary for completing the action. In our case, that is the post ID and if the checkbox has been checked.
At this point, the plugin is done. Now the post author credit can be toggled above each post without having to actually update the post itself. Click on the checkbox, then refresh the post page to see it update without having to update the entire post.
Sure, the plugin isn’t the most practical (especially considering we have author boxes in WordPress!) but the principles of implementing Ajax should be demonstrated.
Download The Plugin
The plugin is available on GitHub in two forms. Both contain commented code that follows WordPress coding conventions as well as a simple README for how to get the plugin running in your environment.


Leave a Reply
You must be logged in to post a comment.