Software Engineering in WordPress, PHP, and Backend Development

Tag: PHP (Page 2 of 13)

Identifying and Registering Anonymous Functions in WordPress

Originally, this article started as an explanation for how to remove anonymous functions registered with WordPress. As I started writing, it became obvious it’s helpful to understand what PHP does behind-the-scenes when anonymous functions are registered.

This dude clearly doesn’t understand anonymous functions. The eyes give it away.

Furthermore, this helps give a deeper understanding as to why registered anonymous functions can be problematic and how we can deal with them on a technical level.

Finally, it’s worth noting that I don’t take a hard stance on if anonymous functions should never be used or not. There’s a time and a place where it makes sense, and there’s a time and a place where it doesn’t need to be done. That’s a topic to cover in the future, though.


I’ve mentioned this before, but I’m not in the business of sharing the author of any given tweet [anymore] for the sake of how X/Twitter mobs can behave. Besides, it’s the content of the tweet that warrants a discussion, not the person who said it.

Some time ago, I saw this come across my feed:

I do wish developers would stop using WordPress hooks with (what I think are called) anonymous functions […].

They are very hard if not impossible to unhook.

As mentioned, the how to deregister anonymous functions and the “whether or not this is a good idea” are topics for another post. For now, I want to share what happens whenever an anonymous function is registered with a hook in WordPress.

Named Functions in WordPress and PHP

Brainstorming names for named functions. Naming things is hard.

First, an example:

add_action('admin_init', 'tmAddBackgroundColor');
function tmAddBackgroundColor()
{
    echo '<style>
            body {
                background-color: #f3f3f3;
            }
          </style>';
}

In the code above, we’re using a named function – as opposed to an anonymous function – to do the following:

  • add_action('admin_init', 'tmAddBackgroundColor') hooks the tmAddBackgroundColor function to the admin_init action. It tells WordPress to execute the specified function when the admin area is initialized.
  • The actual function adds a custom CSS style to the admin area.

If I was a third-party developer who wanted to remove this functionality, then I’d locate the function and invoke the following call somewhere in my code:

remove_action('admin_init', 'tmAddBackgroundColor');

This is an obvious benefit to named functions. Even if the function is located in a different namespace, it’s possible to remove the action by prefixing the function name with the name of the namespace.

What happens with anonymous functions, though?

Anonymous Functions in WordPress and PHP

You don’t have to name an anonymous function. You might as well just stare at a wall.

If you’re familiar with anonymous functions, then the following code should be clear. If not, though, take a look and I’ll explain what’s happening after the block:

add_action('admin_init', function () {
    echo '<style>
            body {
                background-color: #f3f3f3;
            }
          </style>';
});

Anonymous functions are generally useful when you have a small, one-time callback that doesn’t need to be referenced elsewhere in your code.

Obviously, the functionality is the same, but it raises the question: How do we call remove_action on this function? That’s something we’re working towards, but first, here’s what happens in PHP whenever you’re working with anonymous functions.

PHP Closures, Closure IDs, and Registration in WordPress

An ID registered for a conference.

Before reading any further, note that a closure in PHP is a way to create an anonymous function.

Just like what’s demonstrated above, it allows us to write a piece of code that can be registered with a hook or, more generally, passed around as a variable. The latter part of this will make sense after we look at what PHP does when an anonymous function is created.

PHP does two things after you register an anonymous function with a WordPress hook:

  1. Generates an ID for the closure. To generate a unique identifier for this closure, WordPress uses the spl_object_hash() function.
  2. Associates the ID with the callback. The generated closure ID is then associated with the callback function, allowing WordPress to track and manage callbacks even when they are anonymous functions.

Given this, another way to write and associate an anonymous function with WordPress would be like this:

$adminInitCallback = function () {
    echo '<style>
            body {
                background-color: #f3f3f3;
            }
          </style>';
};

add_action('admin_init', $adminInitCallback);

And we can get the ID of the closure as generated by PHP by passing the variable to the spl_object_hash function. For example:

$closureId = spl_object_hash($adminInitCallback);

And that will return the ID that’s generated by PHP and associated with the specific hook in WordPress.

But Still, Deregistering Anonymous Functions?

Though this doesn’t help explain how to deregister anonymous functions, it does help explain how things work within PHP.

This will make it easier to explain ideas around anonymous functions ands hooks in a future post.
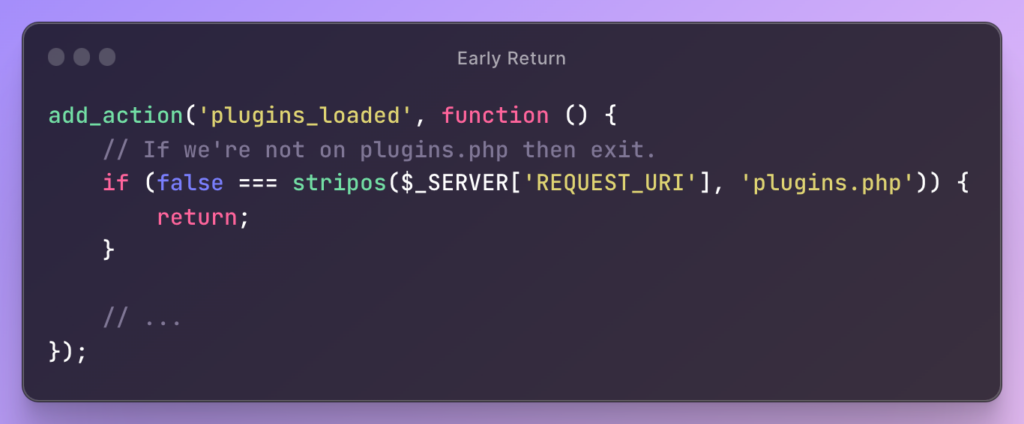
Why We Don’t Always Need Do Perform an Early Return

There are a lot of opinions on how return statements should work.

  • Some say that there should be a single point of return in a function,
  • Some day we should return as early as possible,
  • Some day multiple return statements are fine,
  • And some say that, when applicable, return as early as possible.

I’m sure I’m missing some, but all of these are ones I’m sure the majority of you have seen. And though I don’t hold either of these to be law, I think there’s a time and a place for each.


I’m a fan of the early return statement. In my mind, the sooner we can determine we don’t need to do the work of a function, the better we just leave.

For example, say we know if we’re not on a certain page, we can go ahead and leave the function:

In this case, it makes sense because:

  1. You only want to perform work on the plugins.php page,
  2. The amount of work to be done in the function is larger than what should ever fit within a conditional.

But there’s an alternative when the amount of work is less than what’s above.

Continue reading

Use Custom Functions to Determine Which Environment You’re Running Your Code

WordPress provides constants and functions for setting up and checking to see if we’re in development mode.

Specifically, see the following:

But if you’re in a situation in which you’re working on code that’s, say, WordPress-adjacent where it both talks to third-party APIs and services but also sends data to WordPress (or reads data from WordPress), it may be helpful to have another way to determine if your code is running on a local machine.

Use Custom Functions

Case in Point

Perhaps you’re going to be registering a JavaScript file that requires a dependencies that is not available on your local machine. If this is the case, you have a few options:

  1. Find all of the dependencies from the production application and add them to your local machine ignoring whatever side effects may happen,
  2. Remove a call to the dependencies in your code and try to remember to add it back before committing to source code,
  3. Or use a a drop-in function for checking if you’re running the code locally.

Though I know each option has its own tradeoffs, I find myself doing the third option more often than not. All it requires is evaluating the loopback interface and seeing where the script is running.

In the context of PHP, a loopback interface refers to the ability of a script or a server to send requests to itself. So if you check to see if it’s running on 127.0.0.1, which is an IPv4 variation of localhost or ::1 which is the IPv6 variation of localhost then you can determine how to move foward.

A Simple Example

Here’s my example function:

public function isLocalDevelopmentEnvironment()
{
    return (
        0 === strcasecmp('::1', $_SERVER['REMOTE_ADDR']) ||
        0 === strcasecmp('127.0.0.1', $_SERVER['REMOTE_ADDR'])
    );
}

Then if you want to use this when, say, enqueuing JavaScript sources in WordPress, you can set up a conditional for dependencies like this:

$dependencies = ['jquery', 'acme-scripts'];
if ($this->isLocalDevelopmentEnvironment()) {
    $dependencies = ['jquery'];
}

Then you can enqueue the scripts like this:

wp_enqueue_script(
    'acme',
    $this->jsDir . 'omega.js',
    $dependencies,
    \filemtime(__FILE__),
    true
);

Sure, it’s a simple example but there’s much more that can be done with that single helper function regardless of if you’re working with WordPress, Google Cloud Functions, cloud databases, or more.

There are, of course, much more complicated ways in which custom functions can be written and used. The point isn’t about complexity, though. It’s about thinking through when utility functions like this are helpful and when they should be used.

How You Can Use Ray to Debug Vanilla PHP Utilities

There’s a lot to be said for using a traditional debugger such as Xdebug (and I’m still a fan), but lately, I’ve been writing more generalized PHP utilities that have no front-end and aren’t plugged into any specific application.

That is, I’m using native PHP libraries to run queries against incoming data and help analyze certain aspects of it and output a report.

There’s been a learning curve for a lot of it, but part of the process has included plenty of debugging. And if you’ve read my series on Ray in WordPress, then you know I’m a fan of Ray.

So here’s how you can use Ray to debug vanilla PHP utilities.


In your composer.json file, make sure the following directive is present:

"require-dev": {
	"spatie/ray": "^1.29.0"
},

Then in the terminal, run the following:

$ composer update

You may need to run $ composer install if you haven’t already, but I’m assuming you’re adding to the file you already have set up.

After that’s done, make sure the following is in your PHP code:

<?php

require 'vendor/autoload.php';

// ...

use Spatie/Ray;

At this point, add the following line just to make sure Ray is loading (and make sure the Ray application is actually running). Add the following line:

ray('Loaded...');

Then in your terminal run $ php script.php. Assuming all has gone well, you should see the following:

From there, you can use the rest of the tools outlined in the Ray for WordPress series for doing whatever it is you want. Except at this point, you’re just running Ray for debug vanilla PHP utilities.

New context, same functions. Easy enough!

How To Set PHP Version Parity in Your Shell and in Laravel

As much as I enjoy working with Laravel Valet and using Homebrew to manage different versions of PHP, there are still times in which my system has been set up in such a way that my shell is using one version of PHP and Laravel is using a different version.

At the time of this post, I see the following whenever which I run $ which php:

/opt/homebrew/opt/php@7.4/bin/php

And when I run $ php -v, I’ll see the following output:

PHP 7.4.33 (cli) (built: Jul 13 2023 17:41:11) ( NTS )
Copyright (c) The PHP Group
Zend Engine v3.4.0, Copyright (c) Zend Technologies
    with Xdebug v3.1.2, Copyright (c) 2002-2021, by Derick Rethans
    with Zend OPcache v7.4.33, Copyright (c), by Zend Technologies

But if I was to run phpinfo(); within a page hosted via Laravel, I’d get PHP8. This is problematic because if I’m working on a function that I’m eventually going to incorporate in an app that runs in the browser, there may be functionality that doesn’t work as I expect.

As such, it’s important to make sure we have parity between Laravel and our system’s binary. To do this, issue the following command in the terminal:

$ valet use php@7.4
$ valet restart

Obviously, you’ll change the value of php@7.4 to whatever you want to use on your machine. Whatever it is, though, make sure there’s parity between the two. This way, whenever you run a script independently, then you’ll have the same results in the browser as you do in your terminal.

References

« Older posts Newer posts »

© 2025 Tom McFarlin

Theme by Anders NorenUp ↑