Although I think the title of this series and the articles for each are clear enough, there are other things I’m aiming to do with this series in contrast to the other series I’ve written up to this point, too.
Specifically, two of the things that I’m trying to do is to two:
- keep each article relatively succinct (in comparison to how previous articles have been),
- focus on one thing at a time and keep the description of it short.
Since this is membership content, I don’t mind it being a bit longer than usual, but I also don’t want it to be so long that it’s hard to follow. I’d rather it be a short read with something practical that you can implement after reading each post.
And one of the things that greatly helps with writing better WordPress code is Composer.
Better WordPress Code with Composer
If you’ve read this blog for any length of time, then you know that I’m a fan of Composer (however I’m far from the only person working in WordPress who is).
And though I’ve written some material on it, I’ve not written something with the specific aim to get you up and running with it by the end of reading a single, short article.
To that point, we’re going to need to make some compromises: Namely, I’ll provide a sample configuration file along with a way to organize your plugin’s directory. Then, in the next post, I’ll explain some of the features of Composer.
What is Composer?
First, it’s important to understand what Composer is. And it’s easy to recite the definition as stated on the site, isn’t it? It’s a dependency manager for PHP.
But First, What’s a Dependency?
For some, though, it raises a few questions:
- What’s a dependency?
- Why do I need to manage them?
And if you dig a little deeper, you may find it’s a package manager, and this simply raises the same questions except you just replace “dependency” with “package,” and you’re back where you started.
So I’ll do what I can to make this as clear as possible:
A dependency, or a package, a piece of software that your code uses. It can be something on which it relies for functionality during runtime, such as a way to make HTTP requests, or it can be a library for converting arrays to XML.
Composer makes it easier to include these particular packages in your library by allowing you to:
- download and include the package into your plugin,
- automatically load your plugin during runtime,
- make it easy for your plugin to instantiate or call into the plugin as needed.
This means we don’t have to litter the directories of our codebase with a lot of manually added files and it means we don’t have use include or require all over the place.
These will have their place, which I’ll discuss in the next post, but they won’t need to be automatically installed. Instead, Composer will manage them. Hence, the dependency manager part of its purpose.
Now that you’ve got it installed, you’ve got some context.
Using Composer
Writing this particular section is somewhat difficult because we all have different needs, right? But at the very least, we can all take advantage of an autoloader.
That’s something we all can use.
So here’s what I’ll do:
- I’ll set up a basic plugin directory,
- Create the necessary files for driving the plugin,
- Set up a simple Composer file,
- Execute it
And then I’ll let you see the results. We can get into third-party libraries or other features in a future post (or future series, really).
But if nothing else, this will show you how to go about using Composer to define an autoloader so you can focus on writing code and not on wondering if classes are included.
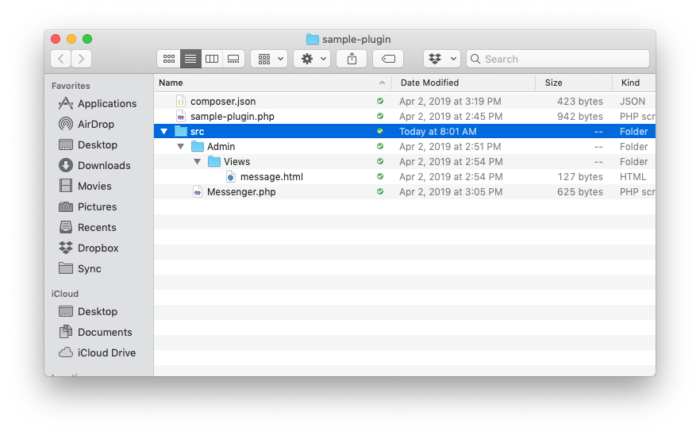
The Plugin Directory
I generally structure my plugins like this:
- there’s a bootstrap file read by WordPress,
- there is a src directory in which all directories and PHP files are kept,
- there is a top-level assets directory where images, JavaScript files, and Sass files are kept,
- and there’s a vendor folder created by Composer to house the dependencies and the autoloader.
Occasionally there may be some other odd folder like an inc or a lib folder, but that’s highly irregular at this point in the type of work I do. And because of that, I’m not going to worry about it for this post.
Instead, my directory looks something like this.

The vendor directory is missing because I haven’t created a Composer file that’s used to execute just yet. But we’ll see that before the end of the post.
Example Files
Let’s get a sample file set up in the plugin. And when I say sample, I also mean simple.
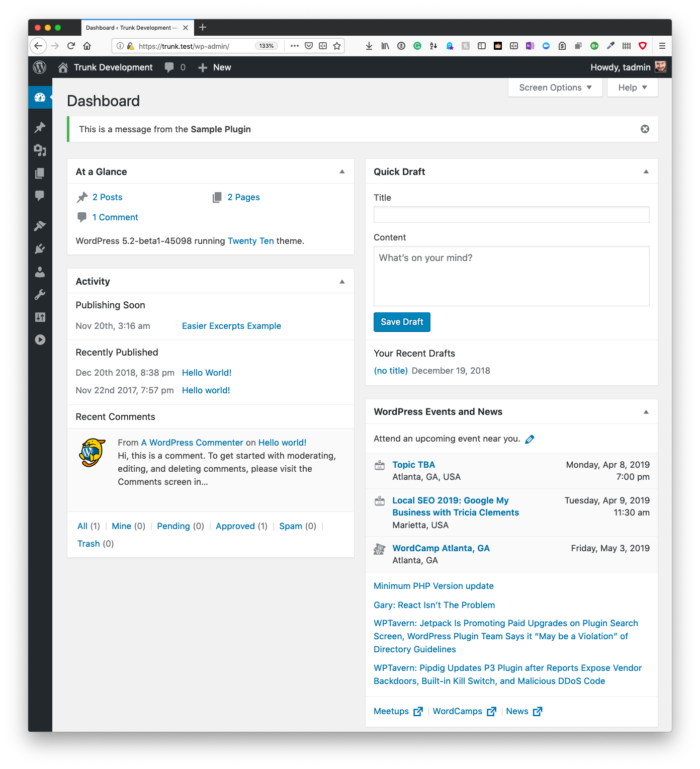
This file is going to have a single purpose: Print a message on the dashboard when you log in to WordPress.
Remember, though, the purpose of this is not to show how to write a well-architectured plugin. Instead, it’s to show how to generate an autoloader to the files of the plugin are automatically generated.
So the bootstrap of the plugin looks like this:
And the file specifically responsible for displaying the message looks like this:
And if you’re curious about the HTML file, it’s simple, too:
I told you it was simple.
The Composer Configuration File
This particular file can be as simple or as complicated as needed. For this post, we’re keeping it simple. The goal, for this post, is to simply give it a name, description, license, the authors, and then how to set up the autoloader.
Take a look here, and then I’ll explain what you see just below it:
First, the name, description, type, and license should be easy enough to follow. The author area is also straight forward, too.
The autoload is the area we’re concerned about right now. It should be pretty clear.
In short, we have a directive for PSR4 which you can read more about and then where a namespace is located. So in the above example, anything in the namespace SamplePlugin is located in src.
This is what tells the autoloader where to look for certain files. And in our case, it’s just going to be looking for the Messenger class.
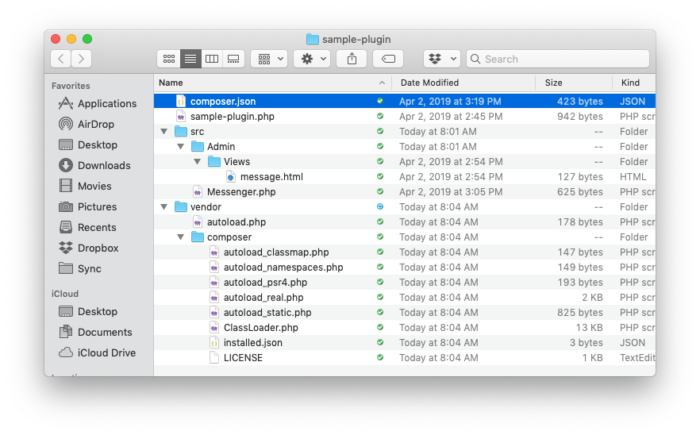
Running Composer
Now that we’ve covered the very basics of the Composer configuration file, it’s time actually to run it. Recall that your plugin directory should look something like this:
In your terminal, enter the following command:
And you should see something like this:
Assuming all has gone well, then you should be able to login to WordPress an activate the plugin.
Seeing It All Together
Once the plugin is activated, then you can navigate to the dashboard of your site. There, you should see a dismissable notice that looks exactly like we saw at the beginning of the post:
If you’ve gotten this far, then you’re good to go! Otherwise, double-check your syntax to make sure all is well. If something is wrong, it’s likely that you wouldn’t have been able to get this far and assuming you have the basic debug constants set, then you’ll likely see where the problem exists.
This Isn’t All
There’s much more to Composer, and I highly recommend reading the documentation for it. Some of this I’ll cover when looking at the tools I plan to cover later in this series but, for now, I recommend getting familiar with some of the conventions.
Oh! And I don’t recommend checking the vendor directory into your repository. That can become a huge directory later, and it can undermine the whole purpose of Composer.
In the next post, I’ll talk about why. Some people do it, and that’s okay, and I’ve done it before, but it’s important to be judicious about when you do.
Err on the side of not doing it. And I’ll explain why in the next post.