In this series, I’ve been talking a little bit about how to simplify the code that we write by breaking it down into more modular components, and I’ve been doing so in the context of WordPress meta boxes.
To be clear, the point of this series is not simply to walk through how to keep the logic organized that goes into meta boxes, but to talk about the various parts that go into making up a component of a WordPress projects and how we can approach them through the their specialized areas of concern, and the how and why it’s important to do this.
In the previous post, I mentioned:
- The Server-Side Logic
- The Presentation Logic
And then I asked about how we actually go about representing the data. In this post, we’ll do exactly that.
WordPress Meta Boxes: Rendering Data
In this post, I’m actually going to be covering two topics:
- Rendering the data for the meta box
- Using a helper class to serialize the information
There’s very little for me to reiterate about what we’re doing that hasn’t already been covered earlier in this post, or earlier in this series so here’s a high-level example of where we’re headed:
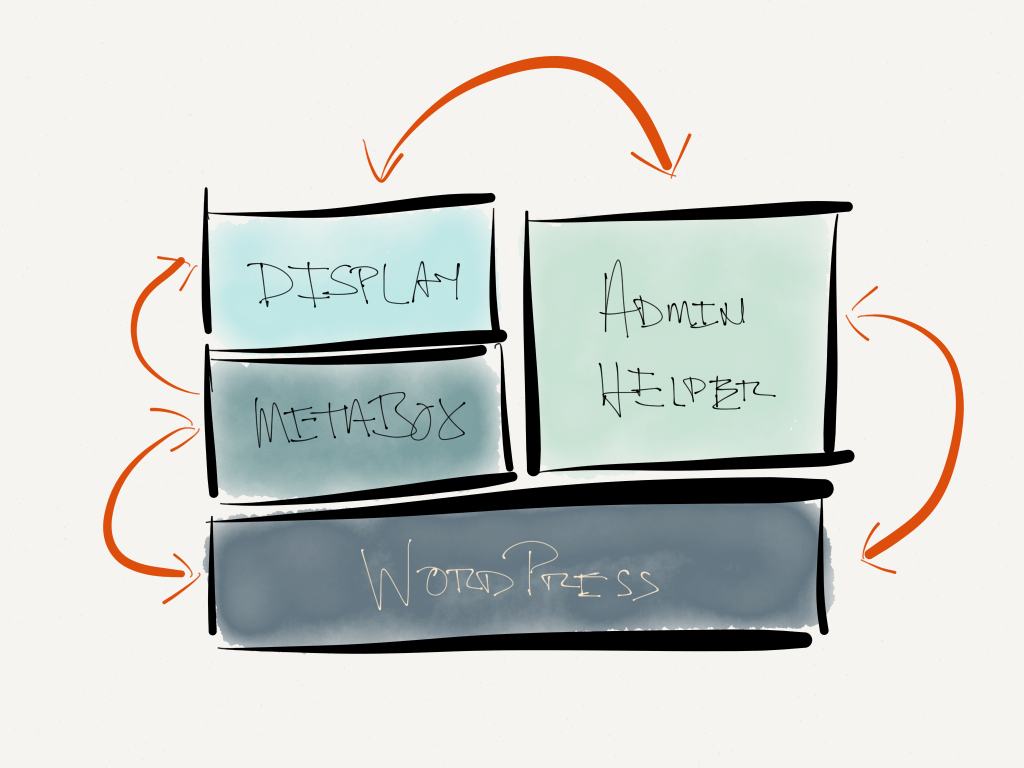
The Components of the Meta Box
Here’s how to read the above illustration:
- Everything sits atop WordPress
- The Meta Box communicates directly with WordPress and WordPress with the meta box
- The Meta Box calls on the display to render its information
- The Admin Helper will communicate with the Display and with WordPress to serialize and return information for display
So with that said, here’s the code we’ve got thus far.
1. Rendering the Data
Recall that the first thing we’re did was call on a template, a partial, or a view (whatever it is you’d like to call it) in order to render the actual information:
Note that if you run the code as it stands right now, it’s not going to execute. The next thing we need to do is actually create the file.
So in the root of your theme directory, add a file named acme-meta-box-display.php and include the following code:
This should provide a simple label and a checkbox; however, it won’t actually save any information. This is where the next component comes into play.
2. Our Helper Class
The helper class (that’s aptly called the Acme Meta Box Helper). This class will do the following:
- Hook into the `save_post` action
- Verify the user has permission to save the data
- Save the data
Easy enough, right?
The code comments should fully explain everything that’s happening.
The final thing to do is to make sure that this helper class is instantiated and setup prior to the meta box rendering so that it can take advantage of hooking into the save_post action. We do this by setting up a function in functions.php that will do exactly this:
At this point, the meta box option should be able to be toggled based on whether or not the option has been checked.
One More Thing to Do
The last thing that needs to be done is to read the data from the meta box and actually have it control the front end which is what I’ll look into in the final post.
For now, though, there’s a lot of code in this post. Though it’s primarily demonstrated through the use a theme, it can also be done in a plugin either via procedural programming or object-oriented programming.
Regardless, hopefully this is beginning to show how various parts that go into making up a WordPress component – be it meta boxes or something else – can, and should, be broken down into more modular components.

Leave a Reply
You must be logged in to post a comment.