At this point, I think most people who develop solutions WordPress on a regular basis are familiar with using WP-CLI. Installing it locally on your system is one thing, using it on your host is another (but it’s all the same once you’re connected).
Case in point: Lately, I’ve been spending a few evenings and times during the weekends working on this site and trying to get it ready for the upcoming redesign. Part of doing that includes using WP-CLI.
If you’re someone on SiteGround (or any host that support WP-CLI, really) and are looking for how to get started using WP-CLI on your host, here’s a quick primer that should provide you everything you need to know to get up and running.
Using WP-CLI on Your Host

Though the steps below are meant to be used whenever you’re looking to use WP-CLI on your host (and any host, at that), I should be clear that I assume the following:
- The host has WP-CLI pre-installed. Most modern WordPress hosts do. Even if they don’t, it’s not difficult to install, but that’s beyond the scope of this post.
- I assume that you’re familiar with SSH keys. If you’re not, that’s okay as I’m going to show you how to create one, but it’s important to be comfortable entering a few commands in your terminal.
- Once you’re able to SSH into your host, you’re comfortable with the WP-CLI commands. If not, no big deal on that either because they are well documented.
With that said, here’s everything you need to know to start using WP-CLI on your host.
0. Create an SSH Key
For those who aren’t familiar, an SSH key (which stands for a secure-shell key) is a combination of two files:
- a public key
- a private key
Both are generated at the same time on your machine (and you may see them in the .ssh directory of your file system if you’ve poked around your file system at all).
Since the pair of keys is generated at the same time, they can be used in conjunction with one another to securely identify that it is, in fact, who says it’s you (or to prevent someone who’s not you) whenever logging into a system.
To generate an SSH key, open your terminal and enter the following command:
$ ssh-keygen -t rsa
After this, you may be asked to where you want to store the set of keys. You can opt to do this in the standard directory (by just pressing enter) or by entering it into the directory of your choice. Just remember whatever you’ve selected.
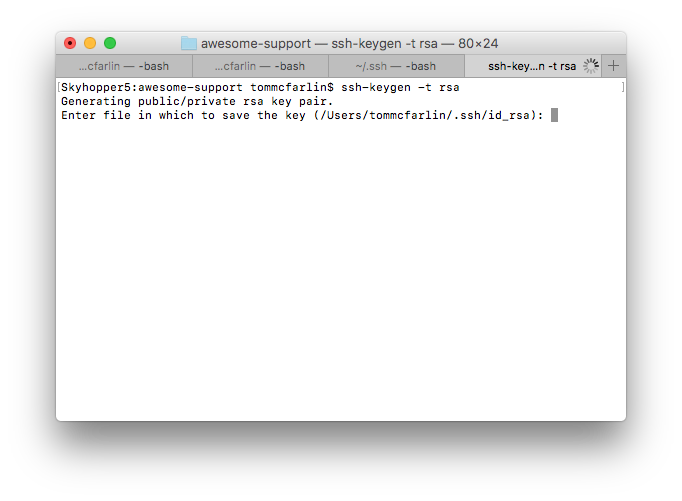
Next, you’ll be prompted to enter a password. Obviously, this can be whatever it is you want it to be but make sure to remember it because it’s the way to identify the relationship between the pairs of keys that will be generated.
1. Upload Your SSH Key
From there, you’ll log into your hosting account. Depending on the software account uses, you’re likely going to see something like cPanel, Plesk, or perhaps just have access to the command-line.
Depending on your level of experience will dictate what comes next. If you’re used to using the command-line, this post is likely unnecessary, so I’m going to use cPanel as an example.
So at this point, look for something like this on the homepage of your cPanel:
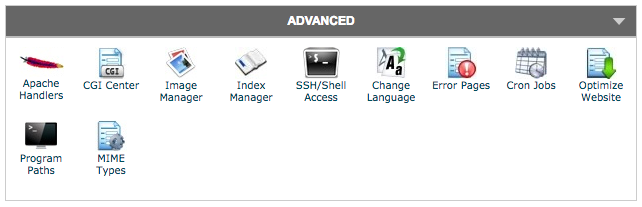
Click on the SSH access icon, and then you’ll be presented with this screen (or one that looks very similar:
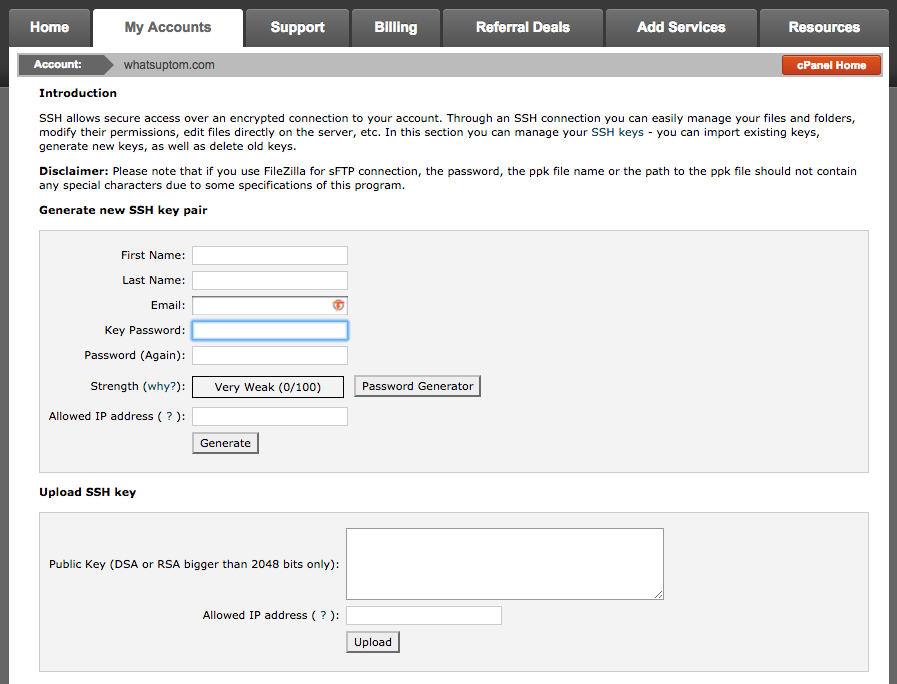
At this point, you take the contents of the keys you generated in the previous step and paste them into the fields that are provided.
2. Specify The Allowed IP Address
Next, you’ll notice that if you haven’t specified anything, any and all IP addresses will be allowed.
While this may sound like a good idea if you travel a lot or use a VPN or something like that, it is a security risk, and I don’t recommend leaving it open. Instead, start with whatever IP you typically use and then add more as needed.
You can always remove and add more as you go along.
3. SSH Into Your Account
At this point, you’re ready to SSH into your account. How you go about doing this will depend on your host. For example, you’ll need:
- the hostname,
- the port
And these will vary from host to host. You may, for example, be able to log in like this:
$ ssh username@domain.com -p1234
And then you’ll need to enter the password you used when creating your SSH keys.
Once done, you’ll be in your hosting environment on the command-line and will be able to use the commands to more easily administer your WordPress installation(s).
Using WP-CLI
Though this guide seeks to be as comprehensive as possible regarding using WP-CLI on your host, I also know that it does not provide a solid example of how to get started with WP-CLI.
If you’re interested in doing that, I recommend these two resources:
And perhaps, in the future, I’ll include a few of my notes on the how and why I recommend using it. Until then, this should get you far enough into the hosting environment to begin using it.