In the past posts in this series, I’ve covered the following two topics:
- Writing Unit Tests with PHPUnit, Part 1: The Set-Up. A guide to getting started with writing PHPUnit tests through the use of a basic cache and using the setUp method of the framework.
- Writing Unit Tests with PHPUnit, Part 2: The Tear Down. A tutorial on how to write unit tests that properly leverage the setUp and tearDown methods of PHPUnit.
Each of the above is meant to provide a primer for how to get started with writing very basic unit tests. Things can get more complex especially as an application or project grows (but that’s always true, right?).
But to make sure one is prepared for that, there’s one final component to unit testing that I believe we should focus on and that’s understanding the PHPUnit XML Configuration File (which you may have seen in other projects as phpunit.xml).
PHPUnit XML Configuration
So in this post, I’m going to setup a simple project that uses PHPUnit, writes a few tests like the ones we’ve already seen, and leverages a configuration file to automate testing.
Furthermore, I’m going to do what I can to best explain the necessary parts of the configuration file so you can include one in your next project.
[restrict paid=”true”]
1. Stubbing Out The Files
Before getting into actually writing testable code, it’s important to know the files that will be needed to get the process working.
The following is, more or less, how we organize things from the outset of a project:
- a directory for tests,
- the phpunit.xml file
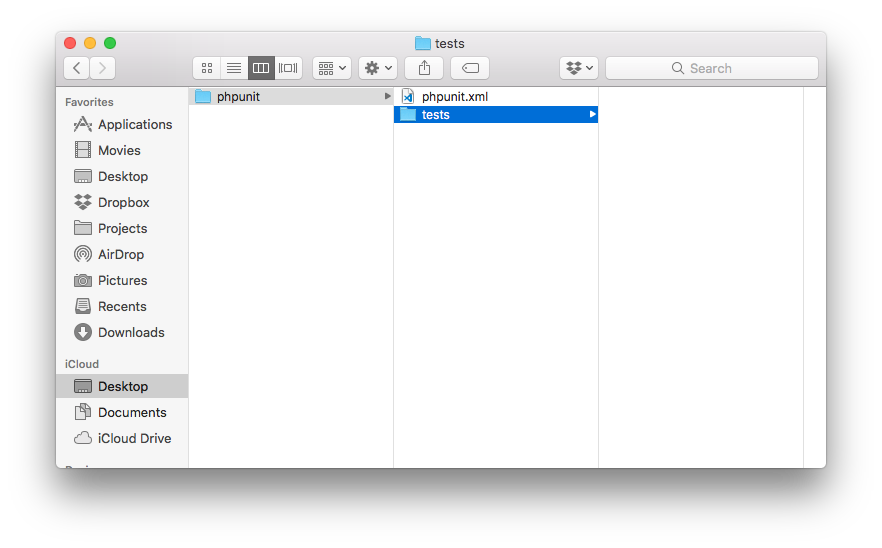
Eventually, you’ll also see:
- the files that make up the project,
- the tests that verify said files.
At this point, though, let’s take a look at the XML configuration file and then attempts to run PHPUnit automatically without any other parameters.
2. The Basics for the Configuration File
First, let’s look at the basic configuration file:
Now let’s understand what exactly we’re looking at (other than simple XML).
- phpunit. The parent node does the usual job of defining the schema for the XML file, but there are a few other components we’re namely concerned with:
- backupGlobals. This is actually related to an annotation that we can make in our source code. Globals are something we should try to avoid in object-oriented programming, but if you opt to use one or need to use one, then this will tell PHPUnit to handle the values the global variables are maintaining (and will give you the option to restore them). I generally leave this as-is.
- bootstrap. This is optional, but if you opt to include other files with your tests (like bringing in a mocking library, part of WordPress, or a third-party library), then this will all you to define the location of the script that needs to execute. Mocking and bringing in WordPress is outside the scope of this post but it’s something we’ll likely look at in the future as it’s useful when testing plugins. For now, I’ll be including a simple autoloader that basically adds all files in the root of the project directory. The full source for it will be shared later in this post.
- colors. If you want the console to print out a report of your tests and do so using colors (to help more easily identify warnings, notices, errors, and so on), then set this to true.
- The following are all boolean values. I recommend setting them to true for the most aggressive reports possible. This way, you won’t get away with simply having notices or warnings slip through while only worrying about errors. This is more of an exercise in code quality than anything else.
- convertErrorsToExceptions
- convertNoticesToExceptions
- convertWarningsToExceptions
- testsuites are made up of collections of tests. Because a given project can have multiple tests, it’s important to make sure that you give each suite a unique name and reference the proper path to the group of tests. For our example, we’re only going to have a single test suite and its located in the tests directory.
- logging is a feature that can be as simple as printing data out into the console or using a third-party library (like Clover) to generate reports that help with continuous integration. Since I’ve yet to discuss the latter in any of my previous posts, we’re going to stick with the console as our main method of output. Thus, we have php://stdout as our only logging output.
With all of that said, our XML file has everything that PHPUnit needs to run without any other parameters.
Remember, though, before proceeding through the rest of this article, I assume you’ve globally installed PHPUnit on your system using Composer. If not, review this article as it will provide you with instructions on how to do so.
Once done, you can verify PHPUnit is installed by enterting the following command in your terminal:
$ which phpunit
And you should see something like the following:
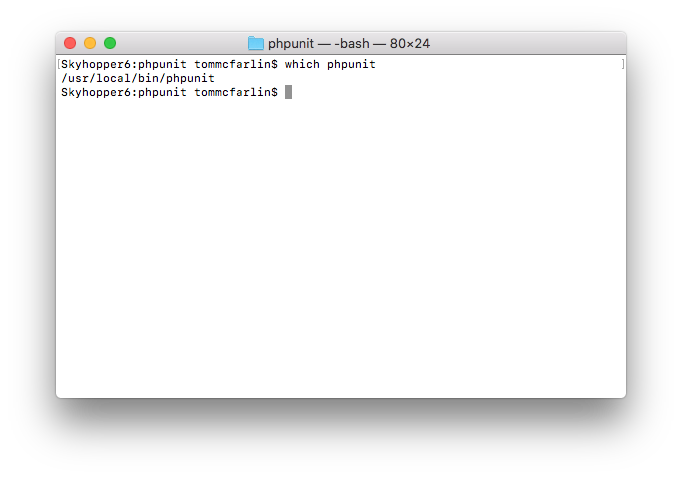
If you see something like the above, then you can execute PHPUnit anywhere from your system.
3. The Bootstrap File
Before going any further, let’s write a basic bootstrap file. We’ll call it bootstrap.php and drop it in our tests directory. It’ll include the following:
This is a simple “autoloader” (which I hesitantly call it that given that it’s just iterating through files and requiring them, but it works for our purposes).
At this point, let’s set up a basic test.
4. A Basic, Failing Test
If you read anything about test-driven development, then you’re likely going to hear about to red-green-repeat cycle. There’s a lot to be said about that and I recommend reading up on it, but it’s not the purpose of this post.
Instead, we’re more focused on actually writing tests that match what we need to do, right? So with that said, let’s do the following:
- create a directory out of which you’re going to have some basic PHP files that we’ll test,
- in the root of the directory, also create phpunit.xml and populate it using the code shared earlier in this post
- create a tests directory where we’ll place our tests.
Now, from the Terminal, change directory into the project’s directory (which is admittedly lacking, for now) and then simply run phpunit:
$ phpunit
Assuming all is setup correctly, you should see something like this:

Since we have no code and no tests, we’re naturally going to see the output above, right? So let’s write a single test that will execute (and fail) since there’s no code for it actually to test.
First, in the tests directory create a file called AcmeCacheTest.php. And let’s have it do something simple like instantiate a cache object that we’ll eventually create.
Before running the test, notice that we:
- Make sure to use use PHPUnit\Framework\TestCase
- And have our class extend TestCase
This is part of what makes using PHPUnit so easy. Once that’s done, run the following code from the root of your project:
$ phpunit
After that, you should see the following:
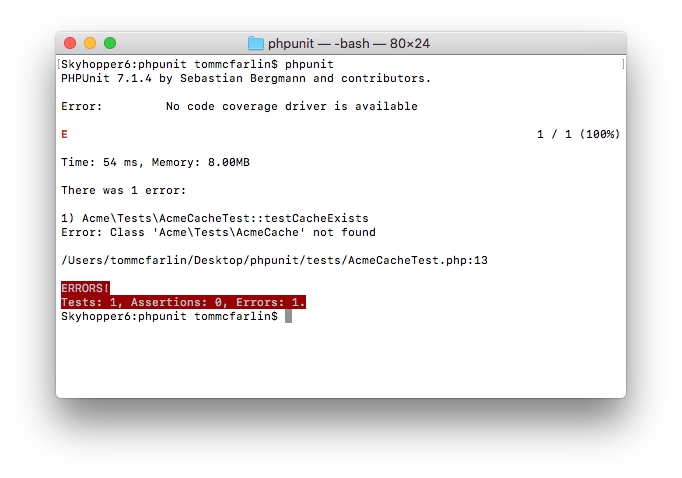
Notice that this will yield a failing test and it will tell you where the problem was found, the file, and the line.
To fix this, we need to write a class:
4. A Few Basic, Passing Tests
The basic passing test (which will be based on previous code) will include the following:
- a namespaced file,
- will represent a simple cache,
- will be automatically loaded by PHPUnit using the bootstrap.php file shared above
- and will have a duration set in its constructor along with a setter and getter for the value
First, let’s test that we’re able to set up the class and that it’s not null. This is a bit of an unnecessary assertion since we know we’ll have a class properly instantiated, but it gets us into the groove of writing tests:
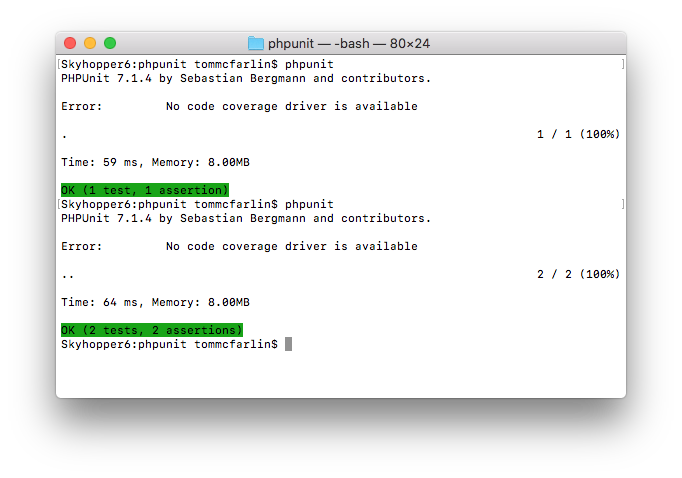
And run the test:
Next, let’s verify the default value of the cache is set:
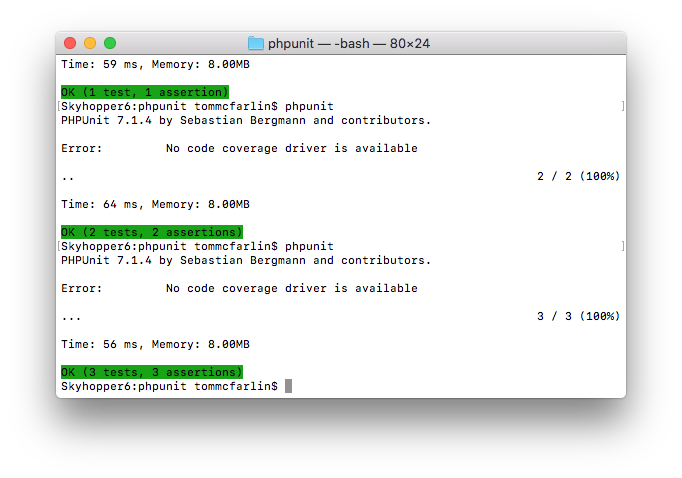
As with the previous step, run the tests, and you should now see two passing tests:
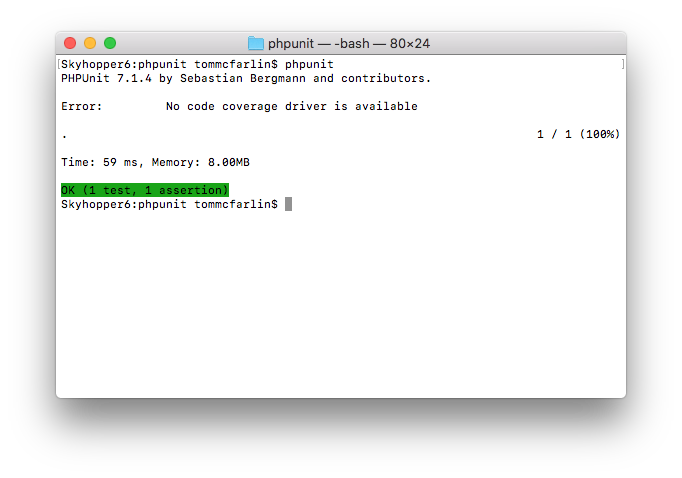
Finally, let’s test to see if we’re able to successfully change the value:
And the final three passing tests:
And there you have it:
- a PHPUnit XML File,
- a simple bootstrap,
- a single, namespaced class,
- unit tests for each method of the class
Granted, it’s simple, but this lays the fundamentals for so much more than what many people already do with their tests.
[/restrict]
Further, it gives you something to build upon as your testing chops grow stronger.
Is There More? (Always, Right?)
Finally, if you’re eager to really dive into the configuration file, you can read the manual’s in-depth explanation of it.
Note, however, everything that’s outlined above aims to be what you need to get started with setting up your own PHPUnit XML Configuration file.