I’ve written several posts about WordPress meta boxes. Perhaps the series of posts closest to what I’m going to touch on in this post is the one that outlines:
You can read each of these if you want, but they aren’t necessary for this particular post. If you’re familiar with WordPress meta boxes and how to create them programmatically, then you should be good to go.
The short of it is this:
There’s a consistent way to create WordPress meta boxes in an object-oriented way. This includes an interface, defined methods, and permission and security checks.
A lot of people who work with WordPress use third-party code to create these features. This includes other plugins or generators. That’s fine. I’d say that falls more into the implementor camp, but that’s beside the point.
Further, it’s not the point of this post. Instead, this post focuses on concepts for WordPress developers looking for object-oriented solutions.
WordPress Meta Boxes
If you work with WordPress long enough, you’re likely going to need to create a meta box. Honestly, you’re probably going to be creating a lot – especially if you do a lot of client work.
The nice thing about meta boxes is they are predictable. That is, at least as it relates to how to create them. To that end, it’s easy to put together some scaffolding for your meta boxes.
Of course, the implementation will vary. But that’s programming, right?
Anyway, given that there’s a predictable way to create meta boxes, I thought it would be worth sharing some code that outlines an object-oriented approach to WordPress meta boxes.
This post assumes you’re familiar with what they are and how they work, as well as the rest of the information in the Codex. If you’re not familiar, then I’d recommend reading that article first.
1. The Interface
Interfaces are part of the core of object-oriented programming. They provide a contract that any class that implements it must follow.
Since meta boxes have a predictable setup, it’s an ideal place to create an interface. A general interface for a WordPress meta box may look something like this:
Obviously, this does not include any specific business logic. And it shouldn’t. Instead, it only provides the functions that should be common to all meta boxes.
Business logic – or domain-specific logic – should live at the class level.
2. The Classes
Creating a class for a meta box is pretty easy. Assuming you’ve implemented the interface, you need to do the following:
- Register a hook for creating the meta box.
- Create a function for displaying the contents of the meta box.
- Register a hook for saving whatever the user has provided.
At the highest level, this would look something like this:
But this raises two questions:
- What about permissions and security?
- Why is the display logic a separate file?
First, permissions and security can be generalized only so far. That is, we can check for permissions and nonce values but the specific implementation of your class may be more (or less) stringent.
Secondly, the display logic is in a separate file because I think that keeping anything that’s template related – even if it’s just a partial template – should live in a separate file.
Though you can include markup and and styles in a single PHP file, it muddles the code. You’re mixing languages at the highest level which isn’t necessary.
This hurts maintenance, readability, and extendability.
3. Starting The Plugin
To round out the above code, here’s how you may end up stubbing out the plugin’s bootstrap:
Of course, this is just an example and the actual implementation is largely contingent on what you plan on creating. This just sets everything created up above in motion.
4. File Organization
Once you have the basic functionality of your meta box completed, you’ll probably want to add stylesheets, JavaScript, perhaps images, and other assets.
Before doing that, though, it’s helpful to have a plan for how you’re going to organize your files. Here’s how I do it:
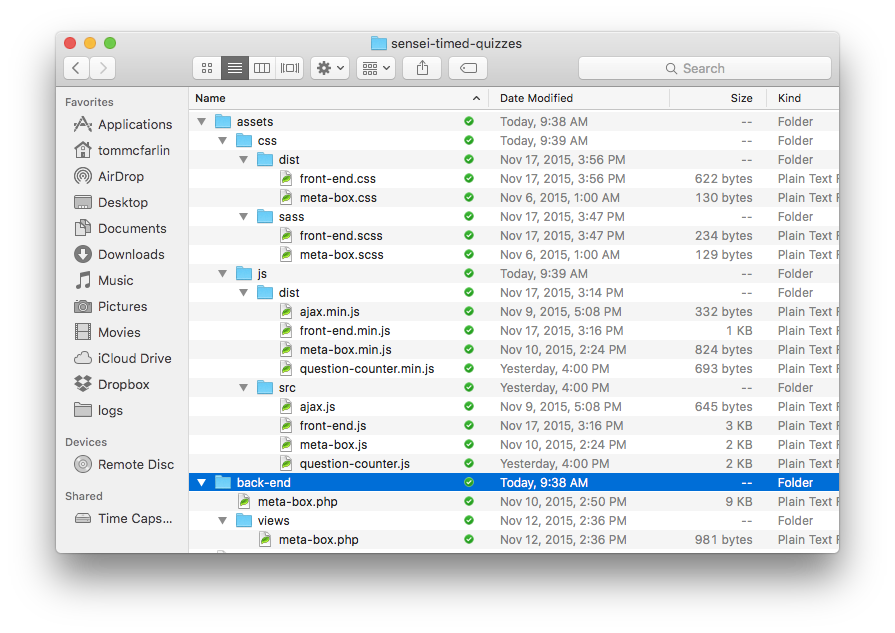
This isn’t necessarily the best way to do it, though. It’s a way that I use, it’s a way that’s worked well, and it’s something that’s become tried and true the longer I’ve worked with WordPress.
4. Other Functions
If you’re introducing assets, then you’re going to need other functions. This includes things like registering hooks to include your stylesheets and your JavaScript files.
In this case, you’re going to need to introduce more add_action calls into the initialize function. This will result in you adding more public functions to your class.
That’s okay, though. It’s not violating the contract as defined by the interface. And it’s providing functionality specific to your implementation. That’s standard object-oriented programming.
Furthermore, you may need to introduce more protected or private functions. Or maybe you’ll need to introduce other classes. Whatever the case, that’s normal.
Remember, the point of the interface and the basic set of function definitions is to provide the core functionality of the meta box. Everything else is specific to your problem’s domain.
It’s Not Definitive
This isn’t the definitive way to create a WordPress meta box, but it’s what I’ve found helpful.
Whenever I work on a project that calls for this type of functionality, this is basically the approach that I end up using. Sure, I might tweak it a little for my implementation, but the gist of the meta box remains the same:
- Initialize it
- Setup a `display` function
- Define a `save` function
The rest are details all relevant to what you’re doing.

Leave a Reply
You must be logged in to post a comment.